Managing your posts
Wix Blog: Managing Tags
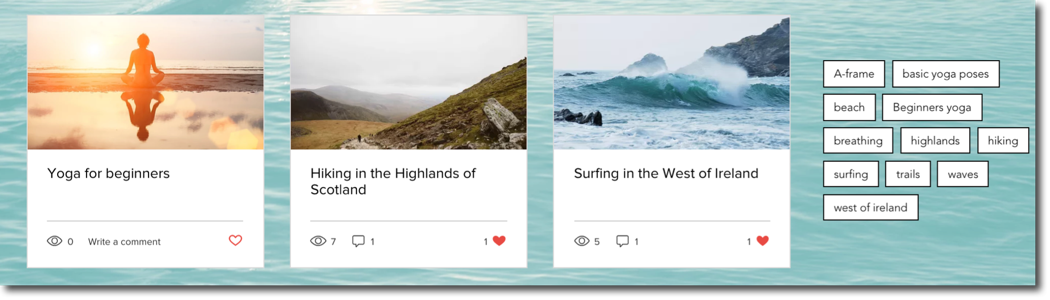
Tags help you categorize and organize your blog posts. They make it easier for readers to find related content, improving their overall experience on your site. For example, if you have a cooking blog, you can tag posts with keywords like "vegan" or "desserts," allowing visitors to quickly locate all recipes that match their dietary preferences.
Creating tags
From Tags in your dashboard, you can create and manage your tags. The tags appear on your Post page under each blog post.
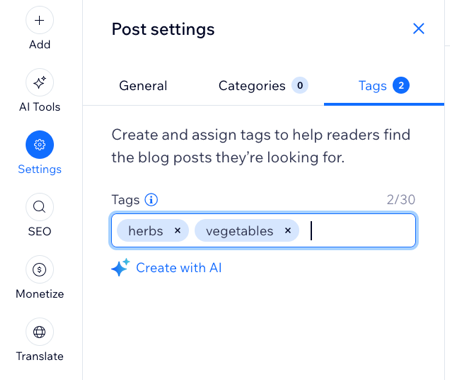
Each tag has a limit of 50 characters, and you can have a maximum of 30 tags per post. Tags need to be separated using commas.
To create tags:
Go to Tags in your site's dashboard.
Click + Create Tag.
Enter your Tag Name and Slug in the fields provided.
Note: The slug field automatically populates based on what you add in the tag name field.(Optional) Click Edit SEO Settings and customize the tag's SEO information.
Click Save.
Go to Posts in your site's dashboard.
Hover over a post and click Edit.
Click Settings in the sidebar on the left.
Click Tags.
Add the tag you created.
When you're ready, click Publish.
Tip:
Need help coming up with tags? Use AI to help generate tags for your post.
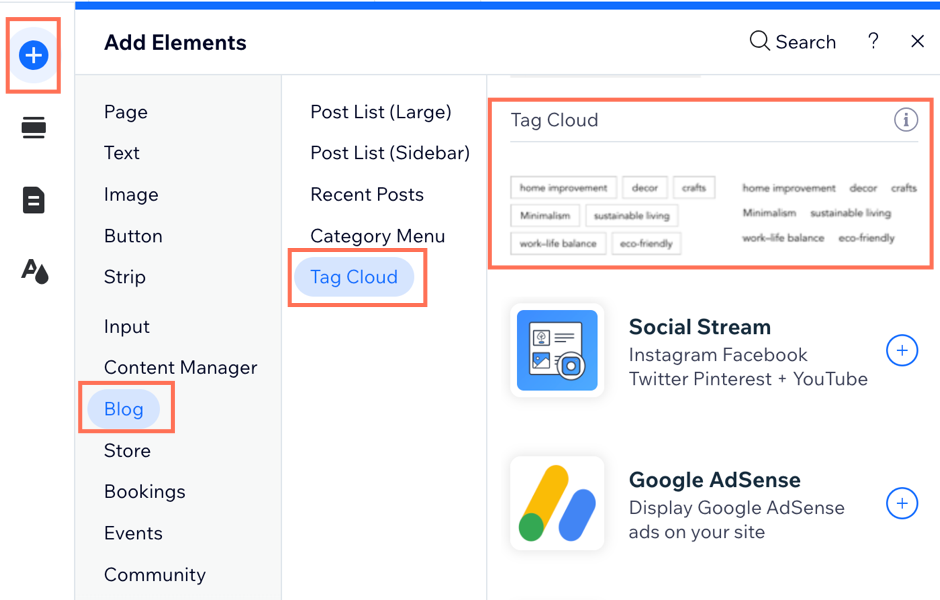
Adding a tag cloud element to your site
You can also add a tag cloud element to your site. Any tags that you've created and are attached to at least one published post are displayed in the tag cloud. A tag cloud can display up to 500 tags.
To add a tag cloud element to your site:
Wix Editor
Studio Editor
Navigate to the page in your editor that you want to add the tag cloud element to.
Click Add
 on the left side of the editor.
Click Blog.
Click Tag Cloud.
Drag a tag cloud element onto your page.
Customizing your tag cloud settings
Once you've added your tag cloud to your site, you can choose what's displayed in the element itself and also customize the layout and design to suit your needs.
To customize your tag cloud settings:
Click the tag cloud in your editor.
Click Settings.
Choose what you want to customize:
Display
Click the Display tab to customize the display settings:Show post count: Click the toggle to show or hide the post count.
Order tags: Choose how you want your tags to be ordered:Most used: Each tag is ordered based on their frequency of use.
Alphabetically: Each tag is ordered alphabetically.
Number of tags displayed: Choose the number of tags you want to display.
Layout
Click the Layout tab.
Customize the following:Choose a tag layout: Choose from either a button layout or a text layout.
Tag alignment: Choose an alignment for your tag: Left, Center or Right.
Spacing between tags:Vertical spacing: Adjust the amount of vertical spacing between each tag.
Horizontal spacing: Adjust the amount of horizontal spacing between each tag.
Text padding:Vertical Padding: Adjust the amount of vertical spacing around your tag text.
Horizontal Padding: Adjust the amount of horizontal spacing around your tag text.
Design
Click the Design tab to customize the design settings:
Customize the regular design settings:Font style & color: Click the color box to select a font color and select a font style from the font picker.
Background color: Click the color box to choose a background color and adjust opacity for the background.
Border opacity and color: Click the color box to choose the border color, and adjust the level of opacity.
Border width: Adjust the width of the border.
Corner radius: Adjust the corner radius.
Click the Hover tab to customize the hover design settings.Font color: Click the color box to choose a color for the hover font.
Background color: Click the color box to choose a hover background color, and adjust the opacity for the hover background.
Border opacity and color: Click the color box to choose the hover border color and adjust the level of opacity.
Customizing your Post page tag settings
Once you've created some tags, you can also customize how they look on your Post page. You can choose how the text appears in your tags, from alignment to font style and color etc.
Note:
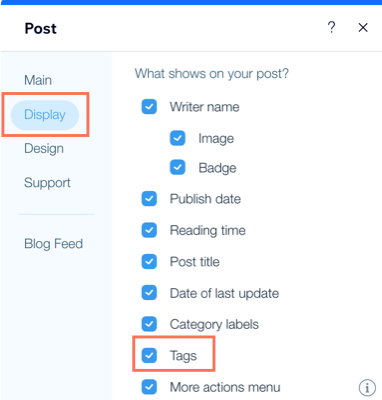
To ensure tags are visible on blog posts, select the Tags checkbox in the post's Display tab.
To customize your Post page tag settings:
Go to your Post page and click on a post.
Click Settings.
Click the Display tab
Select the Tags check box.
Click the Design tab.
Click Tags.
Customize the following:
Tag label
Show label: Click the toggle to show or hide the tag label.
Tag layout
Tag layout: Choose from either a button layout or a text layout.
Tag alignment: Choose an alignment for your tag: Left, Center or Right.
Spacing between tags
Top and bottom spacing: Adjust the amount of space at the top and bottom of the tag.
Side spacing: Adjust the amount of space at the side of your tag.
Text padding
Top and bottom padding: Adjust the amount of padding at the top and bottom of the tag.
Side padding: Adjust the amount of padding at the side of your tag.
Tag design
Regular:Font style & color: Click the drop-down to select a font style, and click the color box to choose a font color.
Background color: Click the color box to choose a background color and adjust the color opacity.
Border opacity and color: Click the color box to choose the border color and adjust the level of opacity.
Border width: Adjust the width of the border.
Corner radius: Adjust the corner radius.
Hover:Font color: Click the color box to choose a font color.
Background color: Click the color box to choose a background color and adjust the color opacity.
Border opacity and color: Click the color box to choose the border color and adjust the level of opacity.
FAQs
Click a question below to learn more about managing tags.
Can I edit an existing tag?
Yes. You can edit it from Tags in your dashboard.
Go to Tags in your site's dashboard.
Hover over the relevant tag and click Edit.
Enter your Tag name.
Note: The URL Slug field automatically populates based on what you add in the tag name field.

Can I delete a tag I no longer need?
Yes. You can delete it from Tags in your dashboard.
Go to Tags in your site's dashboard.
Click the More actions icon
 next to the relevant tag.
Click Delete tag.

Note: You can select all 100 tags, however, you can only bulk delete a maximum of 90 tags at a time. This means you need to manually deselect 10 tags in order to bulk delete 90 tags at once.
