Designing your blog
Wix Blog: Adding a Header to Your Blog Feed
Add a header to your blog feed to help capture your readers' attention right away. A header allows your visitors to understand what the page shows, making your blog more engaging and professional. You can customize the header by changing the color, font and more to match the style of your site.
Note:
The header is only visible on your blog feed. It is not shown on your blog post page.
Step 1 | Add a header to your blog feed
First, add a header to your blog feed. Start by accessing your Blog page in the editor.
Wix Editor
Studio Editor
Go to your Blog page:Click Pages & Menu
 on the left side of the editor.
Click Blog Pages.
Click your Blog page.
Click the blog element on your page.
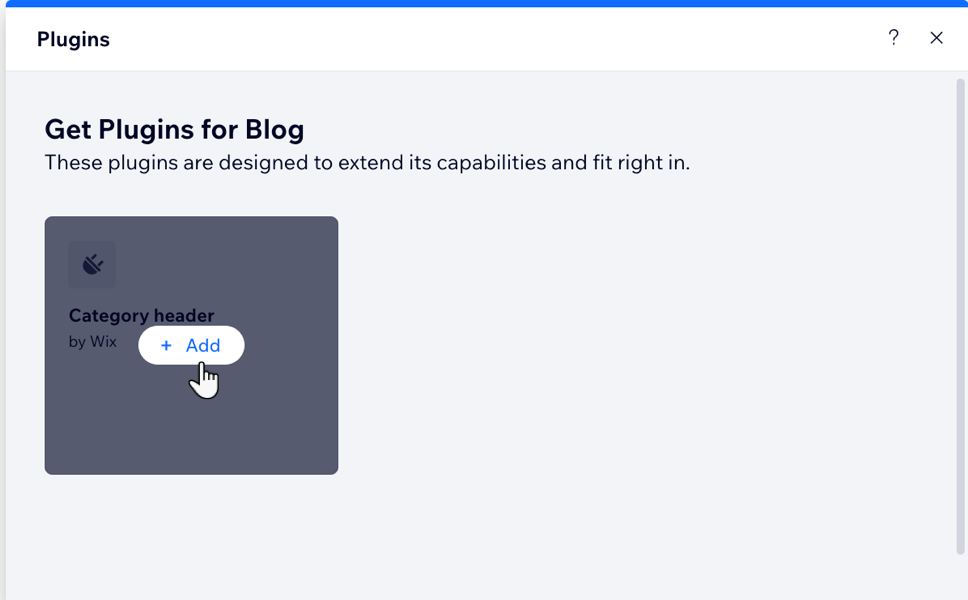
Click the Plugins
 icon.
icon.Hover over the Category header plugin and click Add.
Tip: Switch over to the mobile view to see how the header displays on a mobile.
Step 2 | Customize your header
Next, customize the header to match your blog style. You can customize the layout and design and select an animation to make your header stand out.
To customize your header:
Wix Editor
Studio Editor
Click the blog header element on your page.
Choose what you want to customize:
Layout
Click Header Layout.
Click the Display all posts toggle to enable/disable the text on the header.
Customize the layout using the options available:Category info: Select the alignment and adjust the content width and spacing of your category info.
Image: Select a position for your image and adjust the image height.
Padding: Adjust the padding at the top and bottom of your header.
Design
Click the Design icon
 .
.Customize the design using the options available:Fill Color & Opacity: Select a color and adjust the opacity of your header. Apply the glass effect and adjust the intensity of the blur.
Border: Change the color and opacity of your border and adjust the width.
Corners: Round the corners to make the header more circular.
Shadow: Add a shadow to your image to give a 3D effect. Adjust the angle, distance, size and more.
Animations
Click the Animations icon
 .
.Select an animation from the options available.
Click Customize.
Customize the relevant animation settings, e.g, Motion Style, Direction and Duration.
Note: Available customization options vary depending on the animation you choose.
Elements
Click the Elements icon
 .
.Select what appears on your blog header, Image, Title and Description.
Presets
Click the Presets icon
 .
.Select a preset from the available options.
FAQs
Click a question below to learn more about adding a blog feed header.
How do I customize the header for mobile?
If you are using the Wix Editor, you can switch to the mobile view to customize the layout for smaller screens and enhance the user experience on mobile devices. For the Studio Editor, you can switch between breakpoints to help create responsive layouts that adjust to different screen sizes for a better user experience.
Note: The changes made in the mobile view do not appear on desktop.
To customize the header for mobile:
Click the Switch to mobile icon
 at the top of the Wix Editor or click the relevant breakpoint at the top of the Studio Editor.
Click the blog header element in your mobile editor.
Customize the header using the options available:Header layout: Enable/disable the display all posts toggle and customize the category info, image and padding of your header.
Elements: Select what appears on your blog header, Image, Title and Description.
Presets: Select a preset from the options available.
Can I use different headers for different blog categories?
Yes. The header displays the image, title and description specific to that category, for example, 'Health and Fitness'. You can change what your header displays in the Categories Tab in your dashboard.

To edit your category information:
Go to Categories in your site's dashboard.
Click Edit next to the relevant category.
Edit the information and click Save.
