Managing your site members
Site Members: Managing Your Members
We’re in the process of releasing a new site members dashboard and it's not available to everyone yet.
View and manage your site members directly from the dashboard. The members in your member list include anyone who joined your site's members area, and includes the details they entered upon signup. When viewing your member list, you can make changes to your members' information, assign roles and give badges.
Understading your members' statuses
Understanding your members' statuses helps you manage your site community more effectively. Site members are all the people who currently have access to your members area. The Pending status shows member requests that are waiting for your approval. Blocked members are those you’ve restricted from accessing your members area, while Reported members are individuals who have been flagged by others for review. These statuses help you keep track of activity and maintain a safe, welcoming environment for everyone on your site. You can filter your contacts list to see only your site members.
Creating a new member
You can turn existing contacts into site members when you want to give certain contacts access to members-only areas or features. Choose which contacts to make members, or create new ones and invite them to join your site as members. Your new members will receive an email asking them to create a password for their new account on your site.
Tip:
To turn contacts into site members, make sure they are added to your contact list first. To add them you can create a new contact or import contacts.
To create a new member:
Go to Contacts in your site's dashboard.
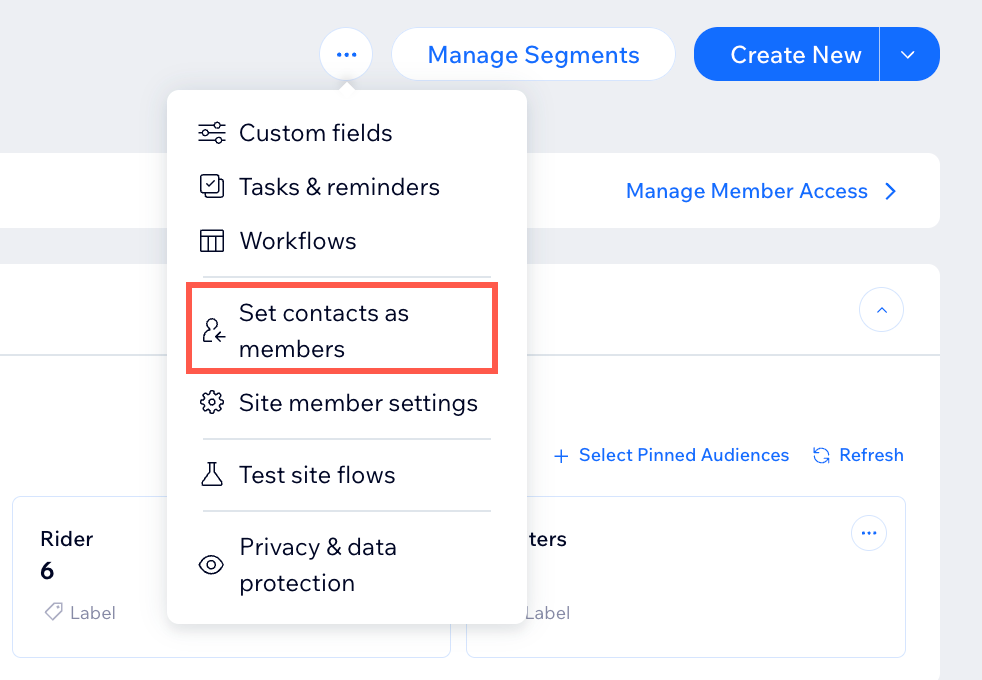
Click the More Actions icon
 at the top of the page.
Select Set contacts as members from the drop-down menu.
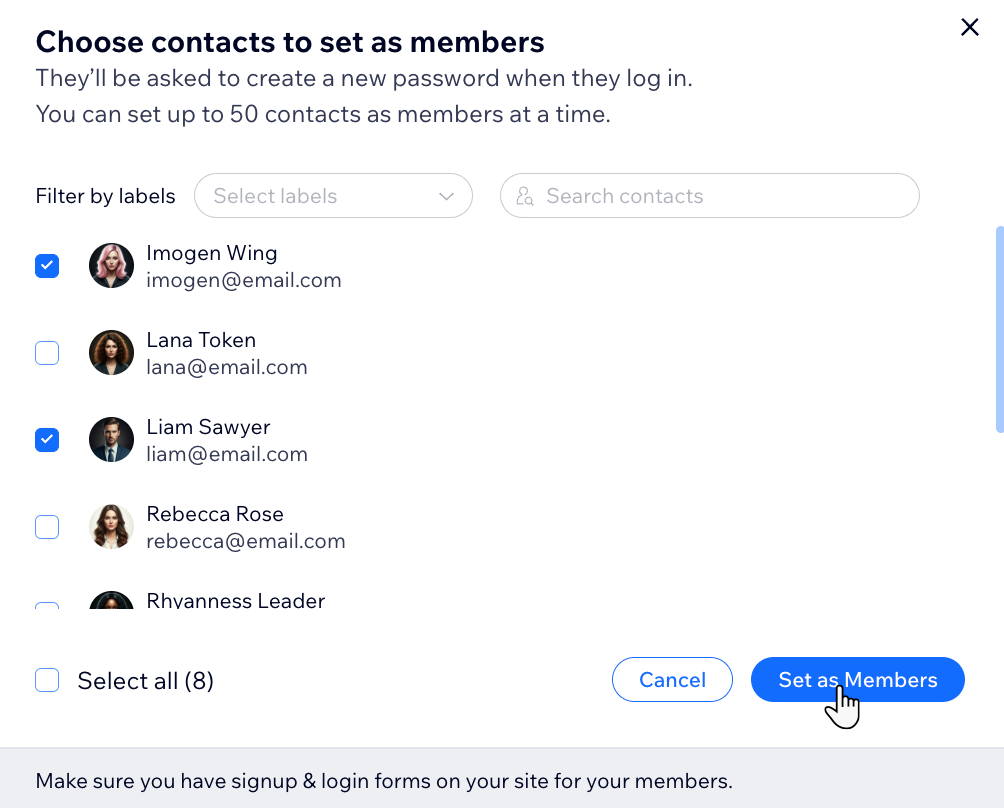
Select the checkboxes next to the contacts you want to set as members.Use the Select all checkbox to choose all available contacts at once if needed.
Filter contacts by labels or search for specific contacts using the search bar.
Click Set as Members.
Viewing and engaging with a member
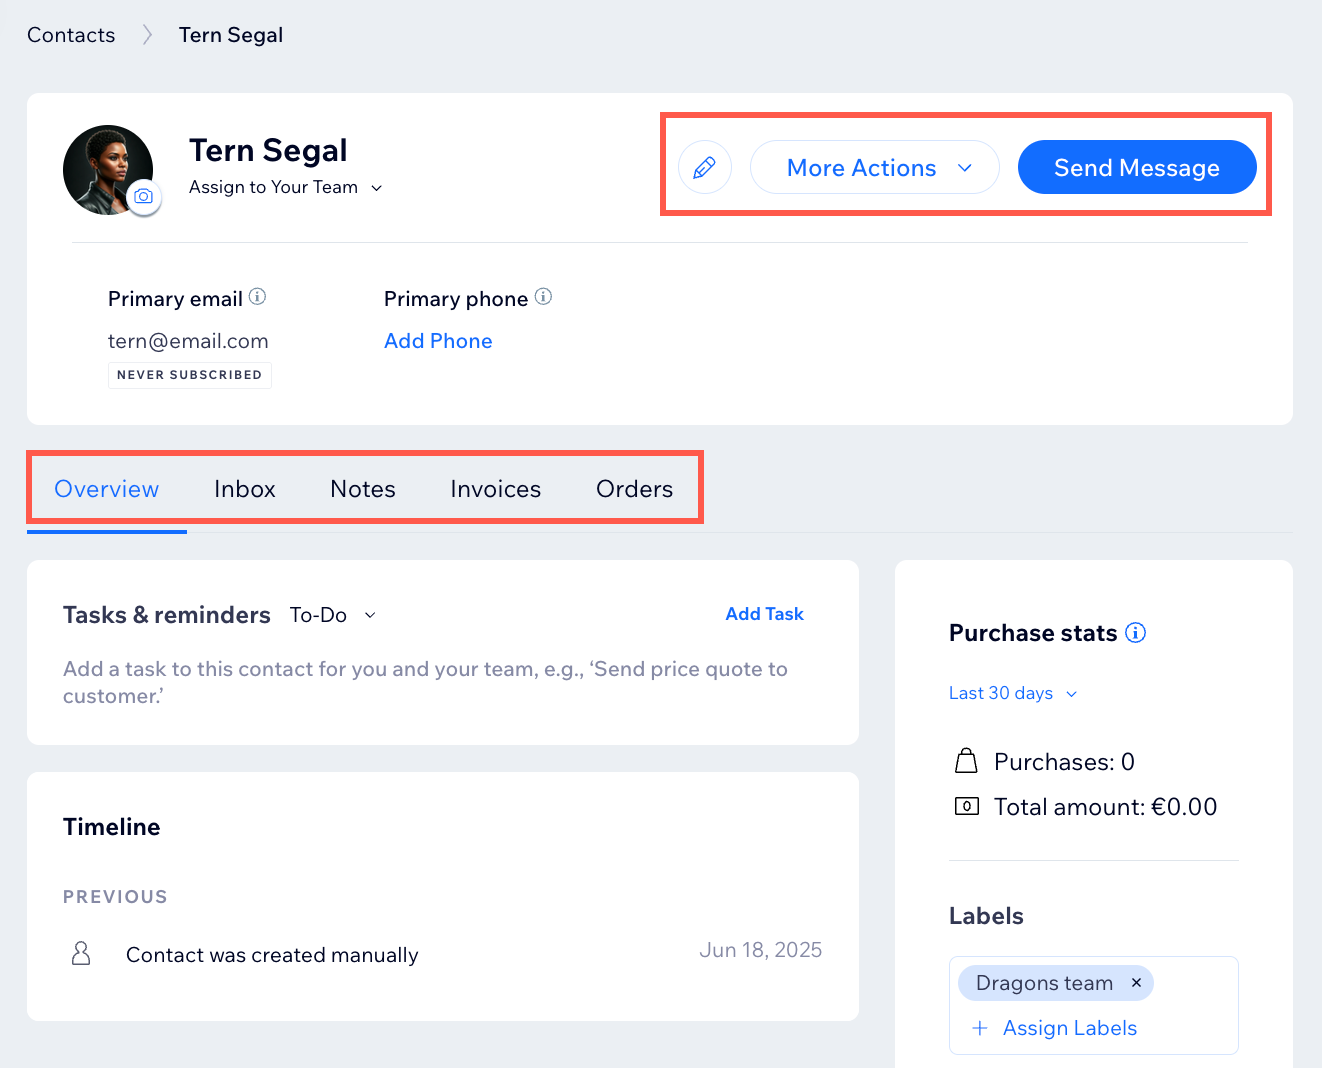
The member card provides various actionable options to manage and interact with your site members. Edit members' profiles, add labels, segments, orders and more. These options allow you to stay organized, track interactions, and complete tasks.
Dashboard
Wix app
Live site
Go to Site Members in your site's dashboard.
Hover on the relevant member.
Click View.
Choose what you want to do next:Click Send Message to contact the member via Wix Inbox.
Click the Edit Contact icon to edit the member's details.
Click More Actions and choose what you want to do next:Add Note: Create a private note for you and your team about the member.
Add Task: Assign tasks related to the member, such as reminders to follow up or send a price quote.
Create Price Quote: Generate a personalized price quote for the member’s requested product or service to send as a proposal.
Create Invoice: Send an invoice to the member to request payment for your products or services.
Delete: Permanently remove the member from your contact list.
Select a tab and choose what you want to do next:
OverviewClick Add Task to create tasks and reminders.
Click Assign Labels to group members based on their relationship with your business.
Click Manage Segments to group members using conditions defined by you.
Inbox: View and send messages to the member.
Notes: Click Add Note to create a private note for you and your team about the member.
Invoices: View invoices relevant to the member.
Orders: View orders relevant to the member.
Managing your site members
View detailed member information, such as email, roles, and labels, and take actions directly from the dashboard, including editing details, changing login emails, assigning, or managing roles, and creating invoices. You can also mute or block members to maintain a positive community environment. Use filters and search tools to quickly organize and find specific members.
Dashboard
Wix app
Go to Site Members in your site's dashboard.
Click the More Actions icon
 next to the relevant member.
Choose what you want to do next:
Edit
This panel allows you to view and edit key details about your site members.
Update the Member's Name: Use the Name fields to enter or update the first and last name of the member.
Edit the Member's Email:Locate the Primary email field and add or edit the member’s email address as needed.
Select the Subscribed/Unsubscribed toggle to manage the member's email subscription status.
Click + Add Email to add additional email addresses.
Update the Phone Number:Use the Primary phone field to enter or edit the member’s phone number.
Choose the phone type from the dropdown menu (e.g., Mobile, Home, or Work).
Select the relevant country code from the dropdown.
Adjust the Subscribed/Unsubscribed toggle to control SMS notifications.
Click + Add Phone to add any additional phone numbers.
Add or Edit the Address:Go to the Address section and fill in the Street, City, Zip/Postal Code, and Country fields.
Select the address type (e.g., Home, Work) from the dropdown.
Add Custom Fields: Click Add New Field at the bottom left of the panel and select or create a custom field to include additional information for the member.
Save Your Changes: Once you’ve made all necessary updates, click Save to apply the changes to the member's profile.
Manage roles
The Manage member roles panel allows you to assign specific roles to site members, helping you control their access to pages on your site. By managing roles, you can ensure that each member has the correct permissions for your site while maintaining security and organization.
Search for Roles: Use the search bar to find the roles you want to assign.
Assign Roles: Check the boxes next to the roles you want to give to the member. You can select multiple roles depending on the member's responsibilities and required access.
Save or Cancel Changes:Click Save to apply your changes and update the member's roles.
Choose Cancel if you want to exit without making any changes.
Tip: Can’t find a role that suits the member? Create a custom role to meet your specific needs.
Note: This option is only available if this person is an active member of your site.

Change login email
Does your member need to change the email address they use to log in to your site? You can help them out on the spot and change their login email directly from your site's dashboard.
Note: This option is only available if this person is an active member of your site.
Mute member
Click Mute to ban members from being able to comment and post on Forum or Blog, or chat with other members.
Note: This option is only available if this person is an active member of your site.

Block member
Blocking a site member allows you to maintain a safe and respectful environment on your site. By blocking a member, you can prevent unwanted behavior and ensure a positive experience for your community.
Note: This option is only available if this person is an active member of your site.
Create invoice
Send invoices, request payments for your services or products, and manage them all in one place to get paid online.
Note: This option is only available if this person is an active member of your site.
Delete
Click Delete to remove the member from your site.
Notes:
Site members with active, pending, or paused subscriptions cannot be deleted until their subscription is canceled. To remove them, first cancel their subscription in the Subscriptions section of your site dashboard, then delete them from the site member list.
Collaborators must also be removed from Roles & Permissions before deletion.
Deleted site members cannot be recovered, so consider backing up your member list as a CSV file before making major changes.
For policy violations, you can block or delete members or assign a "Suspended" role to restrict their access temporarily while retaining their contact information. Be sure to communicate your site policies clearly in your terms and conditions to avoid misunderstandings.
Note: This option is only available if this person is an active member of your site.
Approve
You can control who becomes a member of your site by using either automatic or manual approval for new sign-ups. Review membership requests, so that only the right people gain access.
Note: This option is only available if the person is not currently an active member of your site.
Review reports
To keep your Members Area a safe space for everyone, site members can report other members for reasons like spam, hate speech and harassment. You can then choose what to do with the report - dismiss it, or block the relevant member from your Members Area.
Note: This option is only available if other members reported this member.

FAQs
Click a question below to learn more.
How can I customize my contacts table view?
Choose the columns you'd like to view, and filter and sort your data. Easily browse key contact information.
Customize your columns:Click the Customize columns icon
 at the top right and select the columns you'd like to display.
Drag your columns up and down the list to reorder them.
Filter your contacts:Click Filter at the top right and select the ways you'd like to filter your contacts from the available options.
Click Done.
Sort your list:Click a column heading (e.g. Name). If an arrow appears beside the heading, it can be used to sort your contacts.
Click the arrow to sort in ascending or descending order.

How can I save and manage my customized view?
Create a saved view so you can return to it at any time. Saving a view saves your filters, customized columns and sorting.
Follow the steps above to customize your view.
When you're ready, click Manage View at the top of your Contacts list.

Choose what you want to do:If you've already saved a version of this view, click Save changes to save your changes.
Click Save as new view to save as a new view.
Click Rename to rename this view.
Click Delete to delete this view.
Any views you save will be accessible when you click the drop-down above your Contacts list.
How can I export my contacts?
Click Import / Export at the right side of your contacts table and select Export.
How can I customize the columns in my dashboard member list?
Your member list appears in a table with columns of information on each member. Choose which columns to show and their order in the table, based on the information that's most relevant to you.
Note: Some columns can't be hidden or reordered (e.g. Name and Login email).
Go to Site Members in your site's dashboard.
Click the Customize columns icon
 .
.Choose what you want to customize:Choose which columns to display: Select the checkboxes next to the columns you want in your table.
Reorder the columns: Drag the Reorder icon next to a column and drag it to the desired location.
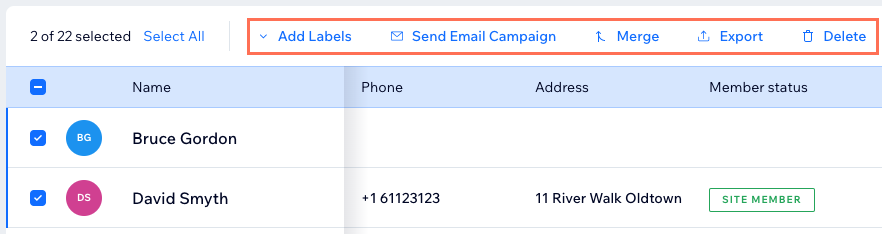
How can I perform an action on multiple members at once?
Select the checkboxes next to multiple members to view the bulk actions available to you:
How can I reset my member's password?
You can reset a member’s password if they need help logging in. After you reset it, they’ll be prompted to create a new password the next time they try to log in. Members can't access your site again until they set a new password.
How can I change my member's profile picture?
To change their name or profile image, members need to update these details themselves from their profile page on your live site.
This article is credited to the Wix team - https://support.wix.com/
