Cart & Checkout
Customizing the Checkout Page
Important:
This article is relevant for Wix Stores, Wix Bookings, Wix Restaurants Orders (New) orders, Wix Donations, and is in the process of becoming available for Pricing Plans.
Your site's Checkout page is where customers enter their details, chose a delivery method, and pay for their orders. While you can't customize the Checkout page from your editor, this article will walk you through how you can use the dashboard settings to customize your Checkout page to suit your business needs.
Customizing the checkout form
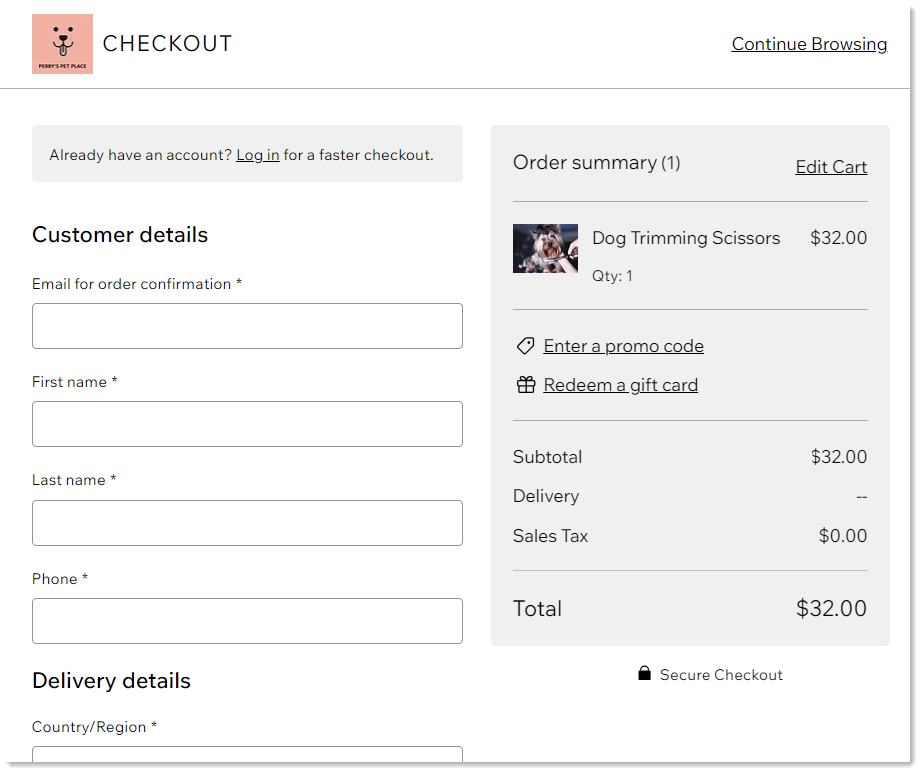
The Checkout page comes with a number of essential fields that cannot be deleted: email, first name, last name, and the delivery details (i.e. the address info).
In addition, you can add custom fields to help you collect the information you need. These can include multiple choice fields, text fields, and more.
Tip:
You can preview the customer detail and delivery detail fields in the Checkout page by clicking the Preview tab at the top.
To customize checkout page fields:
Go to Checkout Settings in your site's dashboard.
Click Edit under Checkout form.
Choose what to do next:
Customize a default field
Email:Click the Email field.
Click Settings.
(Optional) Add text that appears in the field to guide customers:Enable the Placeholder text toggle.
Enter the text (e.g. What name should we add?).
(Optional) Add a field description:
Tip: This information is displayed under the field.Enable the Field description toggle.
Enter a description.
Name: The name fields have no customizations.
Phone:Click the Phone field.
Click Settings.
Enable or disable the Required field toggle.
Note: If disabled, customers can complete checkout without entering a phone number.
Delivery details:Click the group of fields under Delivery details field in the preview.
Enable or disable the Show "Address - line 2" toggle.
Add a new custom field
Click the Create Field on the left.
Select the type of field you want to add.
Customize the field using the available general and advanced customizations.
Tip: Get detailed instructions on how to add and customize custom fields.
Notes:
Go to the order in the Orders tab to view what customers entered in custom fields.
Customers who check out with PayPal do so in the PayPal dashboard, so they may not see custom fields that you added.
Create a conditional rule
You can create rules that govern which fields are displayed on your form.
For example, you can have a custom field asking if this is a business purchase. If the customer selects "Yes", you can then display additional relevant fields. Customers who answer "No" won't see these fields.
Learn how to add conditional rules to your checkout fields.
Adding a subscription opt-in checkbox
Keep customers coming back to your business by inviting them to subscribe to your marketing communications or email list during checkout. You decide whether the checkbox is selected by default or not.

To add a checkbox to the checkout page:
Click the Subscription opt-in checkbox toggle to enable it.
Select or deselect the Checked by default checkbox:Selected: The subscription checkbox is checked by default, but customers can deselect it.
Deselected: Customers need to select the checkbox themselves in order to subscribe to your SMS and email list.
Note: After a customer subscribes, a "Subscribed" label is added to the customer details in your Contact List.
If you added an Additional Info field before Feb. 2024:
If you added a custom field before we released advanced checkout forms, it will still appear on your live site. No need to update anything.
You'll see the field in the new form composer, but without most of the customization options (e.g. without the option to add placeholder text). It appears next to your default fields.
To customize fields added before Feb. 2024, delete the field and re-add it. Note that this cannot be undone.
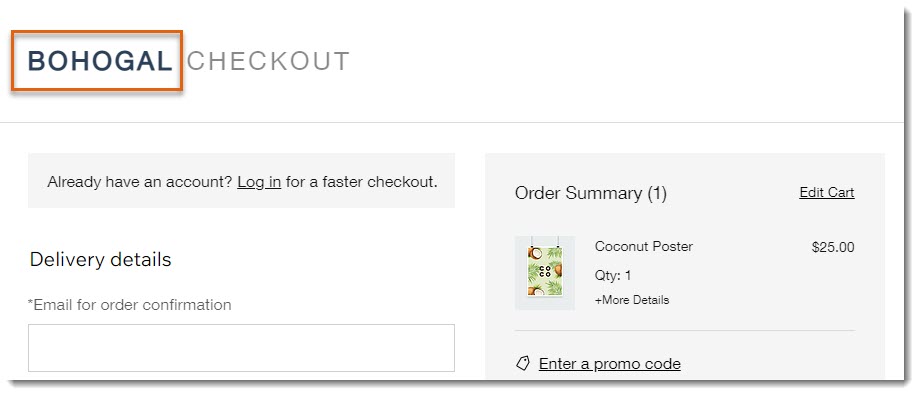
Adding a business name or logo to the header
Decide what to display at the top of the Checkout Page. You can display your company's logo:
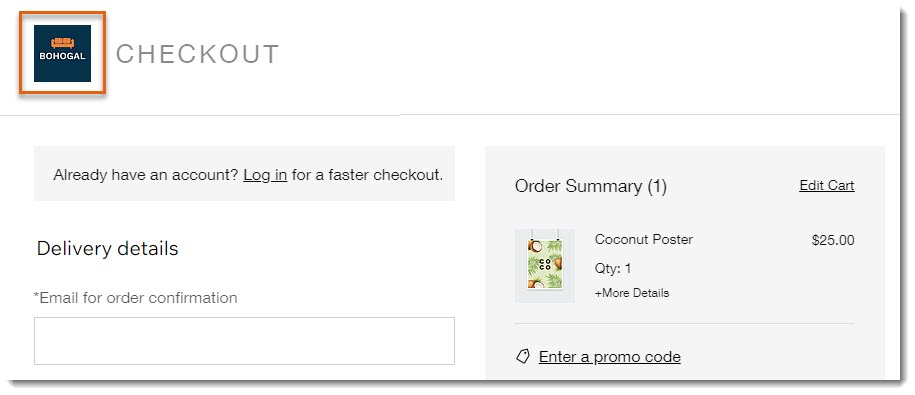
You also have the option of displaying your company name.
Before you begin:
If you have not already done so, go to Settings in your site's dashboard, click Business info, and add your company name and logo.
To customize the header:
Go to Checkout Settings in your site's dashboard.
Click Edit under Checkout header.
Select a header option and customize it:
Display your logo:Click Logo.
Click the Show "checkout" next to the logo toggle to enable or disable it.
Select a logo size.
Select an alignment, side or center.
Display your business name:Click Name.
Select an alignment, side or center.
Click Save.
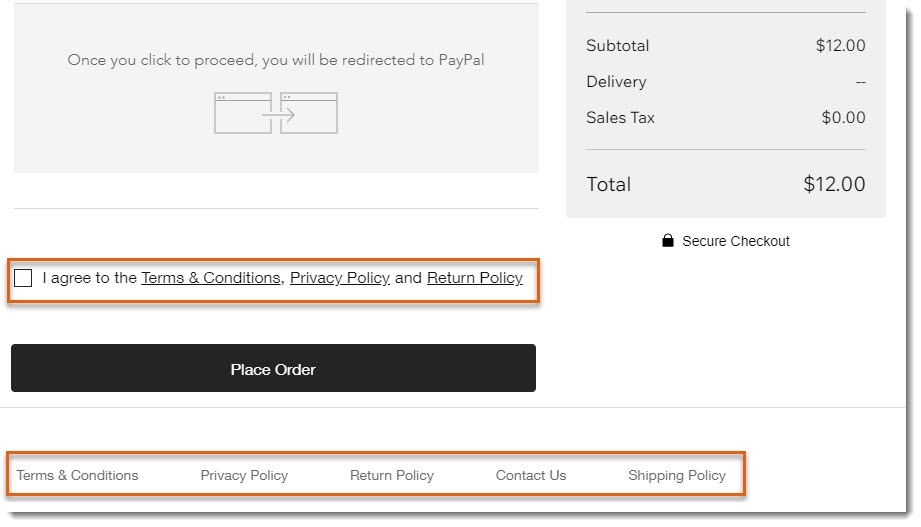
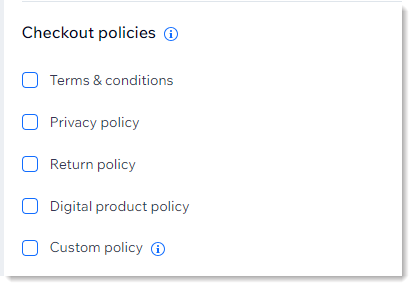
Adding site policies
Display your site's policies on the checkout page so customers know what to expect. Policies can appear:
As clickable links in the footer of your checkout page
(Optional) Next to a policy checkbox that customers must agree to before checking out
To create site policies:
Go to checkout settings in your site's dashboard.
Scroll down to the Policies section.
Select the policies you want to create.
Enter the policy text.
Tip:
As soon as you select the checkbox next to a policy and enter text, it's displayed in the footer of your Checkout page.
(Optional) Create a custom policy (e.g. Shipping Policy):
Note: Custom policies do not appear next to a policy checkbox.Select the Custom Policy checkbox.
Enter a policy name.
Enter the policy text.
(Optional) Add a policy agreement checkbox:
Note: This means customers are asked to agree to your policies before completing checkout.Click the Policy agreement checkbox toggle to enable it
Select a Checked by default setting:Selected: The checkbox is already checked on the Checkout Page.
Deselected: Customers need to select the checkbox to agree with your policy and check out.
(Optional) Click the Contact us toggle to enable it and add all the contact information.
Customizing payment settings
Manage your checkout page's payment settings to fit your needs. Enable or disable options like gift card payments, saving customers' credit cards for future purchases, and authorizing payments before capturing them.
Click below to learn more about each payment setting.
Automatically create an invoice
Click the toggle to automatically create an invoice for every new order paid online.
Enabled: An invoice is created each time an order is paid online.
Disabled (default): Invoices are not created automatically for new orders.
Note: While it is technically possible to enable both automatic receipts and invoice for every paid order, this may cause single sales to appear twice in your financial reports, leading to an over-reporting of revenue.
Add or remove the gift card link
The option to enter a gift card code at checkout is automatically enabled if you set up gift cards. However, you can always disable it if needed.
Go to Settings in your site's dashboard.
Click the Gift cards toggle to enable or disable it:Enabled: The "Redeem a gift card" link appears on the Checkout Page so customers can pay for orders using a gift card.
Disabled: Customers are unable to redeem gift cards.
Important: Do not disable the toggle if you've already sold gift cards, since it will prevent gift card recipients from being able to redeem cards.

Save customers' credit cards on file
Give customers the option of letting you save and charge their credit or debit cards. You can add this checkbox to the Checkout page. When customers pay with a credit or debit card, they can select the checkbox. This allows you to securely save cards on file and charge customers later, with their consent and knowledge.
Important:
Use this payment method correctly to avoid charging customers unexpectedly.
Make sure you read this article to learn how to save cards responsibly.
To charge clients' saved cards, you must use a payments provider that supports this feature, such as Wix Payments or Isracard.

Enabling authorization and capture
Enable this toggle in your Checkout Settings to authorize payments first and then capture (collect) the actual payments later. At checkout, your customer isn't notified that the payment isn't sent immediately. If there's an order you choose not to fulfill, you can void the payment without needing to process a refund.
Payment is then held for up to 7 days. When you're ready to collect or void the payment, you can access the order in the dashboard, click the Collect Payment button, and select Capture payment or Void payment.
Learn more about authorizing payment and capturing funds later.
Important:
Authorization and capture is available only through Wix Payments.
Authorization and capture can only be applied to orders paid for through a credit card payment. This means that additional payment methods, such as PayPal, Apple Pay, Google Pay, and the manual payment method will be hidden from your website (see FAQ below).
It's not currently possible to collect partial captures.

Sending receipts automatically
You can set it so a receipt is automatically sent to your customers every time you receive payment for an order. If an order was paid for using more than one payment, for example 2 credit cards, a separate receipt will be sent for each one.
To automatically generate a receipt for every payment:
Go to Checkout Settings in your site's dashboard.
Scroll down and click Receipt Settings to set up your receipt.
Important: Make sure to set up receipts before issuing them.Click the Create receipt when a payment is added to the order toggle to enable automatic receipts.

Note:
If you previously issued invoices automatically for every paid order, they will no longer be sent.
FAQs
Click a question below to learn more.
Can I add an additional fee to certain orders, such as a fragile packaging fee?
Yes. Using Wix Functions you can set certain conditions that will trigger an additional charge when they are met. Learn how to add additional fees at checkout.
How can I allow customers to leave a tip while checking out?
You can give customer the opportunity to leave a tip on the checkout page using the new Wix Tips app. Choose whether you want to display pre-selected tips or allow customers to leave a custom amount.

How can I remove the "Enter a promo code" link?
By default, a promo code link appears in the Cart Page and in Order Summary part of the Checkout Page.

This link allows customers to enter any coupon codes that you've created for your site. If you don't use coupon codes, you can remove the link from appearing on both pages.
To remove the promo code link:
Click the cart in the editor.
Click Settings.
Click the Settings tab.
Deselect the checkbox next to Promo code link.
Can I preview the checkout process before my site goes live?
Note: Previewing the checkout is available only for Wix Stores.
Yes, you can make a test purchase before launching your online store. To do so, you need to set up certain conditions.
Can I let customers check out without logging into my site?
When you add Wix Stores, Wix Bookings, or Wix Restaurants Orders to your site, the Members area is automatically added. There, customers can save their details, view their orders and bookings, and more.
You can remove the login option from checkout by deleting the Members Area from your site.
Can I change where the "Continue Browsing" link in the Checkout page directs to?
When customers click the "Continue Browsing" link in the Checkout page, they are directed to your homepage. It's not possible to customize this.
It is, however, possible to customize where the "Continue Browsing" link in the Cart page directs.
This article is credited to the Wix team - https://support.wix.com/
