Cart & Checkout
Customizing Links on Your Cart Page
Important:
This article is relevant for Wix Stores, Wix Bookings, and Wix Restaurants Orders (New).
By default, the Cart page has 3 links. Customize the text and design of these links, or remove those you don't need. In addition, you can decide where the "Continue Browsing" link directs to.
Tip:
A "Continue Browsing" link also appears in the cart when it's empty. This link cannot be removed.
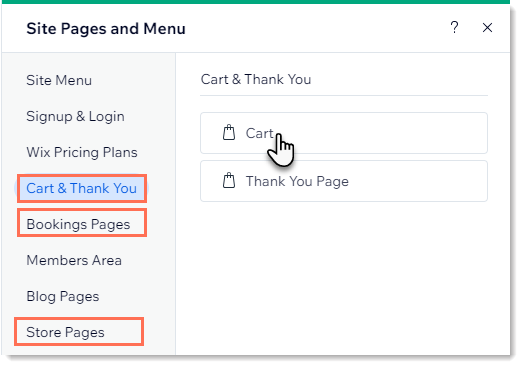
Accessing the Cart Page settings
Access to the Cart Page varies according to which business solution or solutions you use:
Wix Stores: The Cart Page is one of your Store Pages.
Wix Bookings: The Cart Page is one of your Bookings Pages.
Wix Restaurants or any combination of solutions: The Cart Page is listed under Cart & Thank You.
Wix Editor
Studio Editor
Click Pages & Menu
 on the left side of the editor.
Select an option:
My site has only Wix Stores:Click Store Pages.
Click Cart Page.
My site has only Wix Bookings:Click Bookings Pages.
Click Cart Page.
My site has Wix Restaurants Orders (New) / 2 business solutions:Click Cart & Thank You.
Click Cart Page.
Click the Cart Page element on your page.
Click Settings.
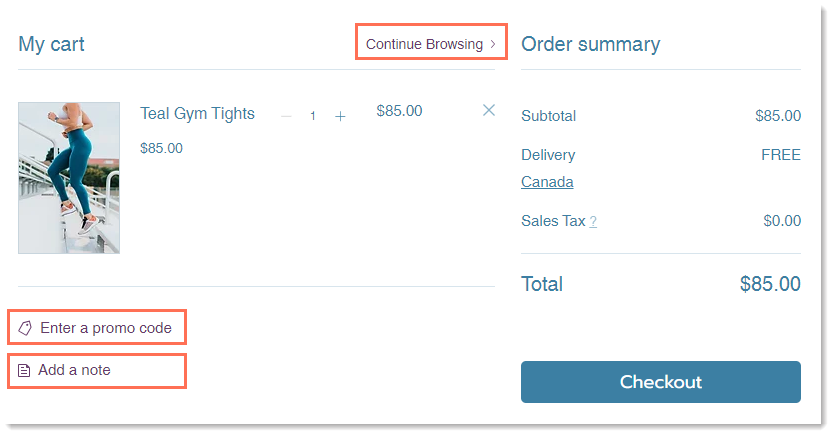
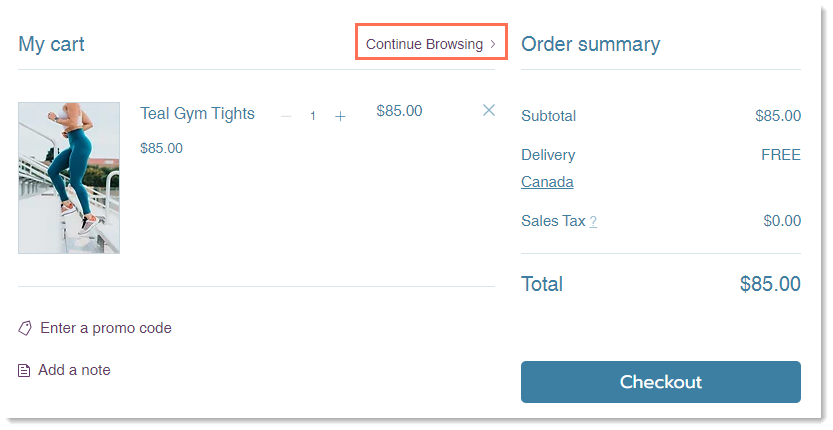
Customizing the "Continue Browsing" links
When the cart is empty, the "Continue Browsing" link is always displayed.

The "Continue Browsing" link also appears when there are items in the cart, but can be removed from this view.
To customize the "Continue Browsing" links:
Click the Cart Page element.
Click Settings.
Choose what you want to do:
Show or hide the "Continue Browsing" link
Click the Settings tab.
Click the Show Link toggle to enable or disable it:Enabled: The "Continue Browsing" link appears in the Cart Page (when the cart has items and when it's empty) and in the Checkout Page.
Disabled: The "Continue Browsing" link appears only in the Cart Page when it's empty.
Set where the link directs to
Click the Settings tab.Under Where does it link to?, click the Link icon
 .
.
Under Which Page?, select what page the link directs to.
Click Done.
Select a font and font color
Click the Design tab.
Under Body, select a new font.
Note: This affect all body text in the Cart Page.

Edit the link color:Click the Design tab.
Click the Links color box and select a new color.
Note: This affects the color of all the links in the Cart Page but won't affect the "Continue Browsing" link color in the empty cart.

Edit the "Continue Browsing" link text
Click the Text tab.
Edit the Continue Browsing link text.
Customizing the "Promo Code" and "Add a Note" links
If you offer coupons on your site, make sure you display the "Enter a promo code" link so that customers can redeem their coupons. You can also display the "Add a note" link to make it possible for customers to leave you a short message.
To customize the links:
Click the Cart Page element.
Click Settings.
Choose what you want to do:
Show or hide the "Enter a Promo Code" or "Add a Note" links
When you remove the Promo code link, it's removed from the Checkout page, as well. This means that customers won't be able to redeem coupons by entering a coupon code.
Click the Settings tab.
Deselect the Promo code link checkbox.
Deselect the Add a note checkbox.
Select a font and font color
Click the Design tab.
Under Body, select a new font.
Note: This affects all body text in the Cart Page.
Edit the link color:Click the Design tab.
Click the Links color box and select a new color.
Note: This affects the color of all the links in the Cart Page.
Edit the "Enter a Promo Code" or "Add a Note" link text
Click the Text tab.
Update any of the following:Edit the "Enter a promo code" text.
Edit the "Add a note" text.
Edit the "Add note instructions" text.
Tip: This text is visible when customers click the "Add a note" link.

FAQs
Click a question below to learn more about the Cart page.
How can I view the cart with items in it so I can see what I'm designing?
The Cart page looks different when it's empty and when there are items in it. If the cart is empty, you can add a store product or restaurant menu item to the cart to help you design how it looks when there are items in the Cart page.
Note: It's not currently possible to add a Wix Bookings service to the cart in preview mode.
To add an item to the cart in the editor:
Click Preview at the top right corner of your editor.
Go to a shop page or your restaurant's online ordering page.
Add an item to the cart.
Click the Cart Icon and click through to the Cart page.
Click Back to Editor at the top right to return to editor mode.
Can I add a note field to the Checkout page?
Yes, you can also add a note field to your Checkout Page.
How can I read the notes that customers send?
You can view buyer notes in the Orders tab.

