Promoting your blog
Wix Blog: Customizing Your Blog's SEO Settings
Creating a blog with Wix is a great way to share your ideas, attract visitors, and grow your business. Regularly adding fresh content helps your site rank better in search results.
Wix automatically applies basic SEO settings to your pages so search engines and social networks can index and display your content. These default settings use your site’s information and follow SEO best practices.
To improve your blog’s visibility, you can customize the search engine optimization (SEO) settings for each blog post, or adjust your site’s SEO Settings to apply them to all posts at once.
Editing the SEO settings for a single blog post
You can customize the SEO settings of individual blog posts in the post's SEO settings. Edit the post’s URL slug, title tag, and meta description and choose whether to let search engines index the post or not.
You also have the option to use the SEO Assistant and its suggestions to help you improve your blog post’s SEO settings. When you open the assistant, it reviews your content and highlights ways to optimize your meta title, description, and keywords. You can decide which suggestions to apply.
To edit your SEO settings:
Dashboard
Wix app
Go to Blog in your site's dashboard.
Click Edit next to the relevant post.
Click the SEO tab on the left.
Choose what you want to customize:
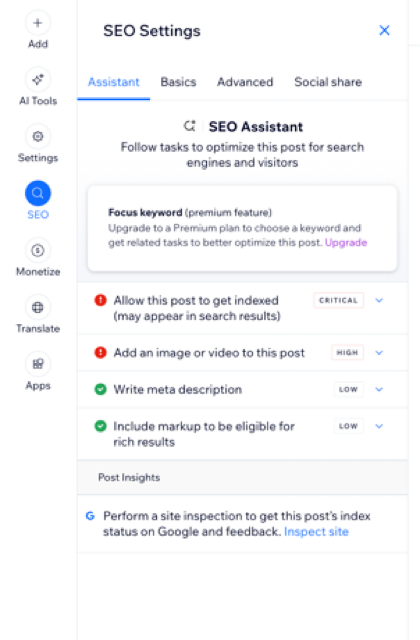
Assistant
The SEO Assistant guides you through important steps to help your blog post perform better in search results. Follow the checklist to see which tasks are critical, like allowing your post to get indexed or adding images. Completed items are clearly marked, so you can easily keep track of your progress and improve your post’s visibility online.
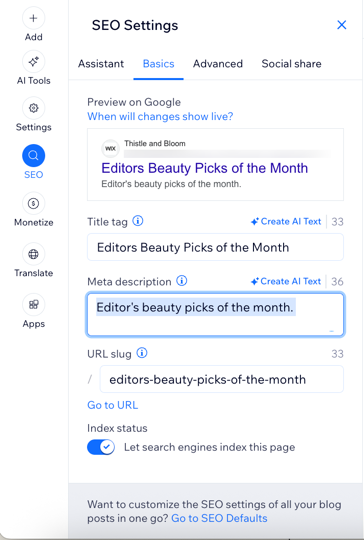
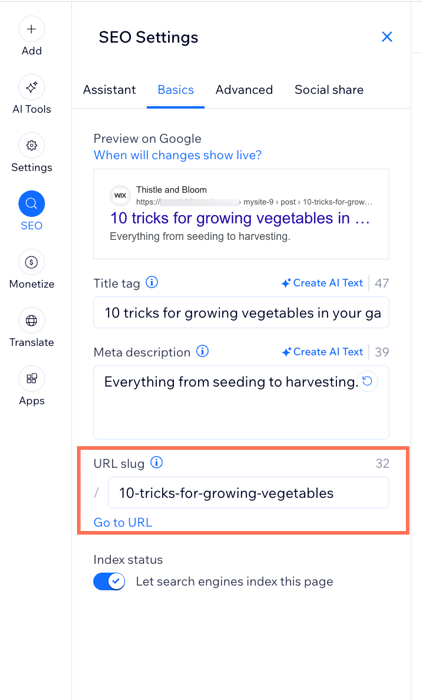
Basics
Click Basics.
Customize the following settings:Title tag: Add a title tag that summarizes the content of the page. Enter your title tag as it is meant to appear on search engines results.
Meta description: Add a short meta description of the content on the page. This description helps users decide if the blog post is relevant to them.
URL slug: This text is the last part of your page's URL. You should only change this if it's necessary to reflect the content of your page. We recommend keeping it short and easy to read.
Let search engines index this page: Enable or disable the toggle to set whether search engines can crawl and index your page or not.
If enabled: People can find your page when searching keywords and phrases in search engines.
Click Publish.
Advanced
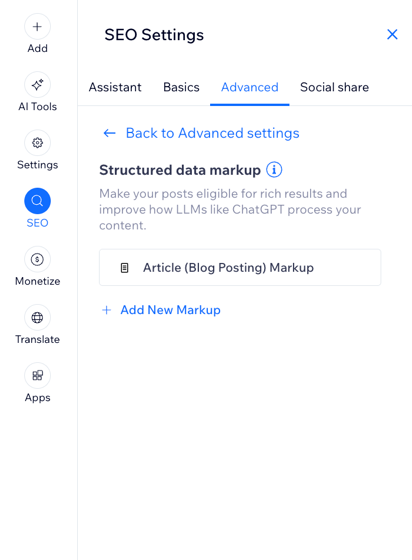
Click Advanced.
Customize the following settings:Structured data markup: Improve how your blog displays in search engines and make it easier for AI tools to read your content. Click + Add New Markup to include extra details for search engines. Learn how Structured data markup works for your blog.
Robots meta tag: Control what information appears in search results by letting bots know how to process your page.
Additional tags: Share extra information with search engines to help them list your page accurately. Click + Add New Tag to add more tags if you need to include extra information.
Social share
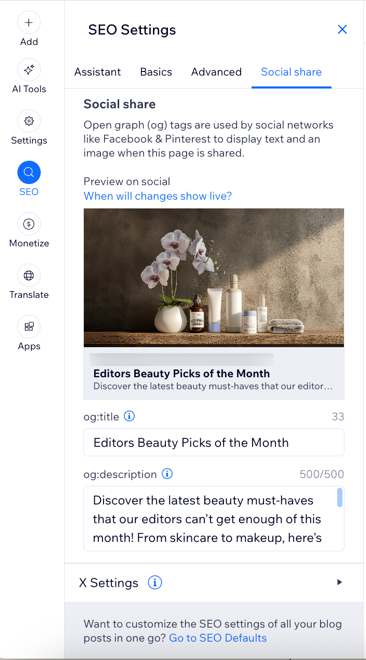
Click Social share.
Customize the following settings:Social Share: Control how your page appears when it’s shared on social networks like Facebook and Pinterest by customizing the social share tags. These settings let you upload a custom image, set the title and add a description that displays when your page is shared.
X Settings: Customize how your page appears when it’s shared on X (formerly Twitter) by customizing the X card options. These options let you upload a custom image, select a card size, adjust the title and add a description that displays when your page is shared.
Customizing SEO settings for all your blog posts
You can use your site's SEO Settings to apply the same settings to all of your blog posts at the same time instead of editing each post's individual settings.
Wix automatically creates default SEO Settings for your blog posts. These settings are based on common SEO best practices and include basic meta tags and other advanced settings. You can customize these settings in your site's SEO dashboard.
Tip:
Learn how to customize your SEO settings.

Editing your post's page URL
When you create a new blog post, Wix automatically generates a URL for it. This URL includes your site’s domain, a prefix such as, /post/, and a unique ending called a slug, usually based on your post’s title. An example URL of this type is: "https://mystunningwebsite.com/about".
Your blog’s URL (or slug) plays a role in SEO by helping search engines understand what your page is about. The URL structure for your main blog page and individual blog posts is part of your site’s hierarchy and should be customized separately.
Here's an example of site page hierarchy for URLs:
/(homepage)
/blog (main blog page)
/blog/my-first-post (specific post)
A correct URL structure for a blog post looks like this: “https://mystunningwebsite.com/post/my-first-blog-post”.
Important:
Customizing your site's URL structure is an advanced topic. Customizing your URLs incorrectly can drastically change your site and cause issues with its search engine ranking. Before you make any changes to your site's URL structure, it's a good idea to consider if the possible risks to your site's ranking are worth the benefits of making the change.
To edit a URL slug for a blog post:
Go to Blog in your site's dashboard.
Click Edit next to the relevant post.
Click the SEO tab on the left.
Click the Basics tab.
Customize the URL slug link in the field provided.
Using canonical tags with your blog posts
When different URLs use the same page content, search engines choose one URL and consider it the primary one. This is the only URL that appears in search results. Other URLs are treated as duplicates and receive less attention from search engines.
For example, you may have a blog post that you publish on your Wix site and on an external blog site. Search engines will consider one of these pages as the primary one for search results and omit the other one.
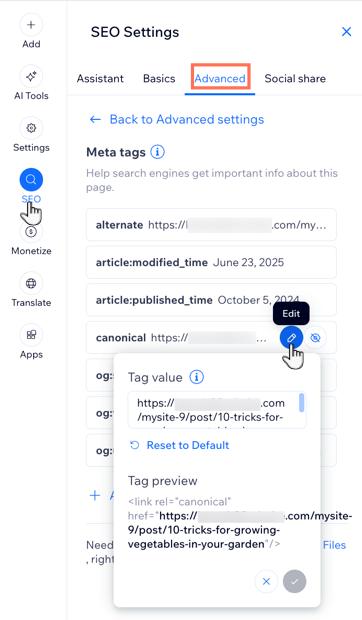
Wix automatically creates a default canonical URL for all of your blog posts. You can change the canonical tag for a post in the Advanced tab if you have multiple URLs that use the content of that post. This tells search engines to index only this post and show it in search results for a given keyword or search phrase.
Important:
Changing your canonical tags can have an effect on how your site appears in search results. Before making any changes here, we recommend learning more about canonical URLs.
To change a post's canonical tag:
Go to Blog in your site's dashboard.
Click Edit next to the relevant post.
Click the SEO tab on the left.
Click Advanced.
Click Additional tags.
Click the Edit icon
 next to canonical under Meta tags.
Enter the URL in the text box under Tag value.
Click the Checkmark icon
 to apply the changes.
Want to learn more?
You can read about Wix's great SEO features and how to use them in the Complete Wix SEO Guide.
FAQs
Click a question below to learn more about customizing your blog SEO settings.
Can I remove the default '/post/' or '/blog/' in my blog post URLs?
No. Most website builders (including Wix) automatically add a prefix like /blog/ or /post/ to organize your blog posts within your site’s structure. This prefix helps keep your URLs clean and tells search engines that your posts belong to your blog section. It can’t usually be removed, but you can customize the rest of the URL (the slug) to make it short and descriptive.
What is indexing and how can I ensure my blog is indexed correctly?
Indexing is the process where search engines, such as Google, store and organize the pages of your site so they can show them in search results. If your blog or site isn’t indexed, it won’t appear on search engines, even if people search for it. Think of it like adding your site to a library catalog—if it’s not listed or organized properly, no one can find it.
Tip: Ensure your important pages are easy for search engines to crawl and index by using the following:
A simple site structure
Why are my blog posts not appearing in Google search results?
If your blog posts are not showing up on Google, it usually means they haven’t been indexed yet. Google can take some time to crawl and index new pages.
To boost visibility, we recommend reviewing and updating the following:
Make sure indexing is enabled in your SEO settings.
Use clear focus keywords in your content and headings.
Write a unique meta description for each post.
Add descriptive alt text for all images.
Submit your sitemap to Google Search Console to help Google discover your pages faster.
Why is 'noindex' or 'nofollow' being applied to some of my blog pages?
The ‘noindex’ or ‘nofollow’ tag tells search engines not to show a page in search results or not to follow its links. This can happen if a page is still in draft, has very little content, or if your SEO settings are set to hide it from search engines.
To resolve this we suggest the following:
Check your page’s SEO settings and make sure it’s published and allowed to be indexed.
Remove the ‘noindex’ tag if you want Google to include the page in search results.
Avoid using ‘noindex’ or ‘nofollow’ unless you specifically want to keep a page out of search engines.
What is alt text and how do I add it to images in my blog posts?
Alt text is a short description of an image. It's usually no more than a few words describing what is seen in the image. It helps search engines understand what the image is about and makes your site more accessible to people who use screen readers. Good alt text can also improve your SEO and help your images show up in Google image search
