Setting up a Members Area
Site Members: Adding a Profile Page to Your Members Area
Give your site members their own personal profile, where they can express who they are to your online community. Members can customize their profile to show a description they wrote about themselves, images, videos and more.
Tip:
When using social apps (e.g. Wix Blog, Wix Forum, Fileshare), the Profile page is automatically added to your site. You can check if it already exists in the Pages panel.
Adding the Profile page to the Members Area
If the Profile page isn't already part of your Members Area, you can add it directly from the Pages panel in your Editor.
Wix Editor
Studio Editor
Click Pages and Menu
 on the left side of the editor.
Click Members Area.
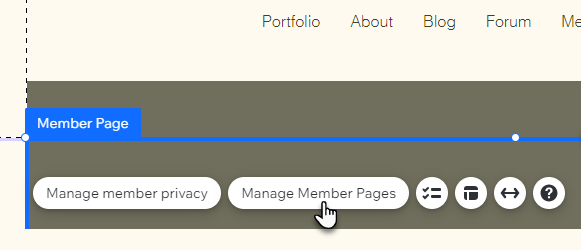
Click the + Manage Member Pages button.
Click + Add Tab next to Profile under the Member Page section.
Tip:
You can also add and remove tabs right from your editor. Click the Member Page element in the editor and click Manage Member Pages to add and remove tabs from your Member Menu.
Customizing the Profile page
You can adjust the settings of the Profile page so the design, layout and text all match your style.
Wix Editor
Studio Editor
Go to the Profile page in your editor:Click Pages
 on the left side of the editor.
Click Member Page under Members Area.
Select the Profile tab from the drop-down.

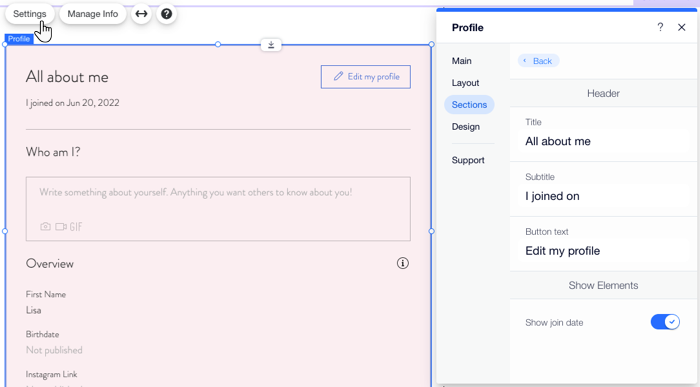
Select the Profile element on the page.
Click Settings.
Click the tabs in the Settings panel to customize the following:Layout: Adjust the spacing between the sections of the Profile page.
Sections: Edit the text and details appearing on the page's sections (e.g. Header, About)
Design: Change the fonts and colors of different elements on this page (e.g. buttons, dividers, the profile's background)
Changing the fields appearing in member profiles
Choose what information is displayed in your members' Profile page. Pick from suggested fields like name and email, or create custom ones as needed. Make sure the fields are set to Public so they appear in member profiles.
To change the fields:
Go to Site Members in your site's dashboard.
Click More Actions at the top right.
Click Manage Member Info.
The current fields appear under Customize Info Fields. Click below to learn how to:
Add more fields
Click Add More Fields at the bottom.
Choose whether to add an existing field or to create a custom field:Suggested field: Click Add next to any of the preset fields (e.g. Address, Birthdate).
Custom field: Click Add Custom Field and enter the field details.
Make a field public
When a field is private, it appears on your members' My Account page and they can fill it out – but it doesn't appear on their profile. You can change that by making the field public.
Hover over the relevant field and click Edit.
Click the Field Privacy drop-down.
Click Public.
Click Save.
Hide a field
Click the More Actions icon
 next to the relevant field.
Click Hide.
Changed your mind?
Your hidden fields are always available for you to re-add, by clicking Add More Fields.
