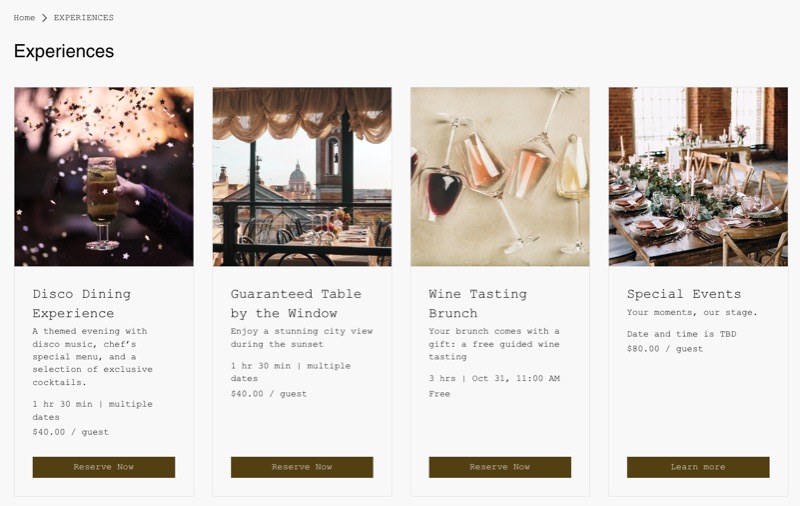
Create a unique dining experience through table reservations that goes beyond a standard booking. Experiences let you showcase what makes your restaurant special — whether it’s a chef’s tasting menu, a wine-pairing dinner, or a seasonal holiday brunch.
Fully customize each experience by setting the schedule, guest capacity, pricing, and booking options to fit your concept.
Before you begin:
Make sure to add and set up Wix Table Reservations on your site.
Step 1 | Create an experience
Start by creating an experience to define what guests can book and how it appears on your site.
To create an experience:
Go to Experiences in your site's dashboard.
Click Create Experience.
Tip: Click + Add Experience if you've already saved at least one experience.
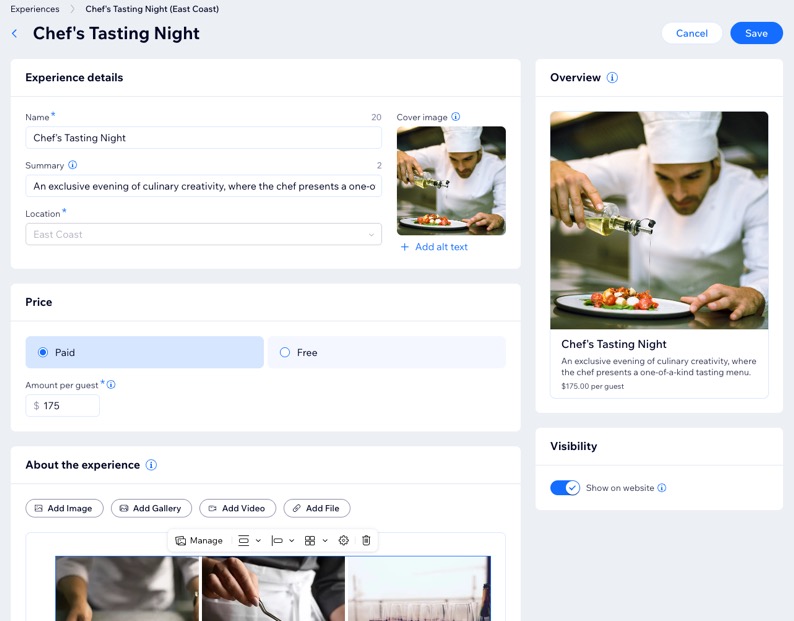
Enter your experience details using the options:
Name: Enter the title of the experience.
Cover image: (Optional) Upload the main visual that appears on your site.
Summary: (Optional) Add a short description highlighting what guests can expect.
Location: (If relevant) Click the drop-down and select the location for your experience.
Note: The location can’t be changed after the experience is created.
Set the Price for your experience:
Paid: Enter the amount per guest.
Free: Select if there is no cost to attend.
Add information in the About the experience section so guests know what to expect. Choose the options that best represent your experience:
Write a description
Write a short description that tells guests what makes this experience special. Include key details like what is included, timing, and any important instructions.
Use the formatting tools at the bottom of the field to enhance your text, such as adding images, links, or emojis.
Tip: Need inspiration? Click Create with AI to generate a draft description and then edit it so it fits your tone and brand.
Add an image
Upload images that visually represent your experience.
Click Add Image.
(In the Media Manager) Select an image and click Add to Page.
Customize your image using a variety of options, such as:
Size

/ Alignment

: Adjust the size and positioning of the image.
Link to a web address or section

: Make the image clickable and direct users to a specific webpage or a part of your post.
Settings

: Add a caption for context, provide alt text for accessibility, enable or disable image downloads, and mark as a spoiler to blur content until clicked.
Add a gallery
Showcase a collection of photos, enriching your experience with an appealing display.
Click Add Gallery.
(In the Media Manager) Select the images for your gallery and click Add to Page.
Tip: You can hold the Ctrl / Command key on your keyboard to select multiple images.
Manage your media with a range of options:
Add media

: Click Manage to add more images.
Edit an image: Click Manage and select the relevant image. Then click Edit and adjust what you want (e.g. add a caption for context and provide alt text for accessibility).
Customize the layout:
Click Manage.
Click the Layout tab.
Choose a gallery layout, set image orientation, and adjust the spacing between images.
Settings:
Click Manage.
Click the Settings tab.
Click the toggle(s) to enable or disable image downloads and mark images as spoilers.
Size
/ Alignment
: Adjust the size and positioning of the gallery.
Add a video
Adding a video offers a way to share more details and provide a dynamic preview of what diners can expect.
Click Add Video.
Choose where to add the video from:
Embed: Paste a URL from YouTube, Vimeo or Facebook.
Upload: Upload a video from your computer or device.
(Optional) Adjust the video settings:
Size
/ Alignment
: Adjust the size and positioning of the video.
Settings
: Click the toggle(s) to enable or disable video download and mark video as spoilers. Then click Save.
Add a file
Click Add File to attach files that diners might find useful, such as chef specialties or where the wine comes from.
6. Click the Show on website toggle under Visibility to display this experience on your site.
7. When ready, click Save.
Step 2 | Set up your experience preferences
Once your experience is set up, fine-tune how guests book it. You can let them reserve online for select dates and times, or have them reach out to you directly to make a reservation.
You can also define important details like the maximum number of guests per time slot, party size limits, and how far in advance guests can reserve.
To customize experience preferences:
Go to Experiences in your site's dashboard.
Hover over the relevant experience and click Edit.
Set your experience preferences:
Schedule
Choose whether guests can make online reservations for specific dates and times, or require them to contact you directly to book.
Click Schedule.
Select the relevant reservation options:
No schedule: Guests need to contact you to reserve a date and time.
Scheduled: Guests make reservations online for the dates and times you set:
Click the Duration drop-down and select how long the experience lasts.
Click + Add Schedule to add the dates and times when guests can book this experience:
Specific date and time: Choose the date and time for this experience, then click Save.
Multiple dates: Set when guests can reserve this experience:
Select the relevant Start date.
Click the Repeats drop-down and choose an option:
Does not repeat: Click the specific day(s) you want to offer.
Click Add start time to set when the experience begins.
(Optional) Click + Add new time to include multiple time slots.
Click Save.
Weekly: Click the specific day(s) you want to offer.
Click Add start time to set when the experience begins.
(Optional) Click + Add new time to include multiple time slots.
Click Save.
Select the relevant End date.
Click Save.
(Optional) Enable the Disable regular online reservations toggle to block standard online reservations while the experience is taking place.
Enabled: Guests cannot make standard online reservations on any table during the experience time.
Disabled: Standard online reservations remain available according to your regular reservation schedule.
Note: This setting applies to all standard online reservations during the experience time. It does not apply only to specific tables or to the tables assigned to the experience.
When ready, click Save.
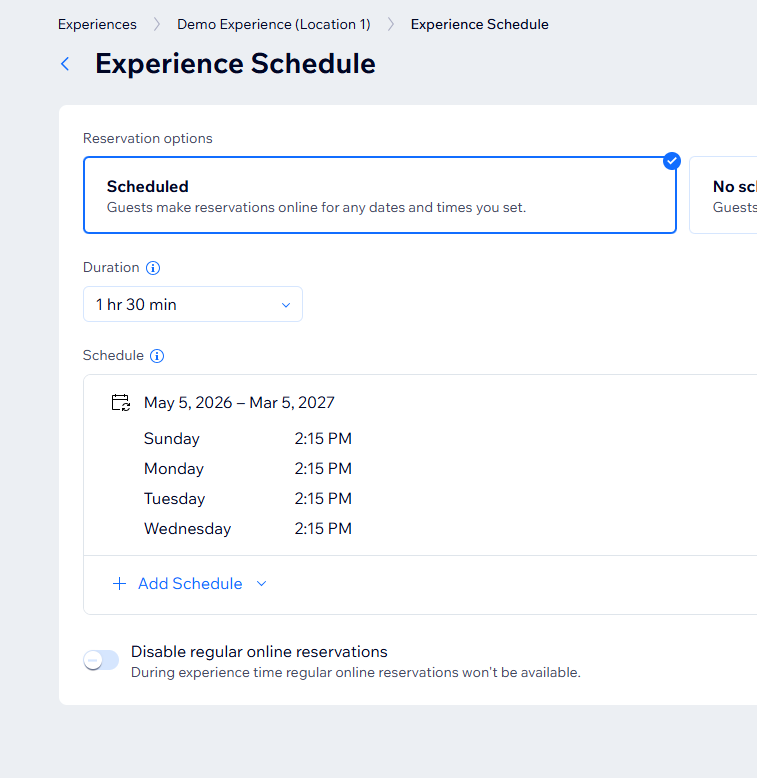
Table assignment
Note: Table assignment is only available when Table Management is enabled in your location's Table Reservations settings. If Table Management is disabled, this setting is read-only.
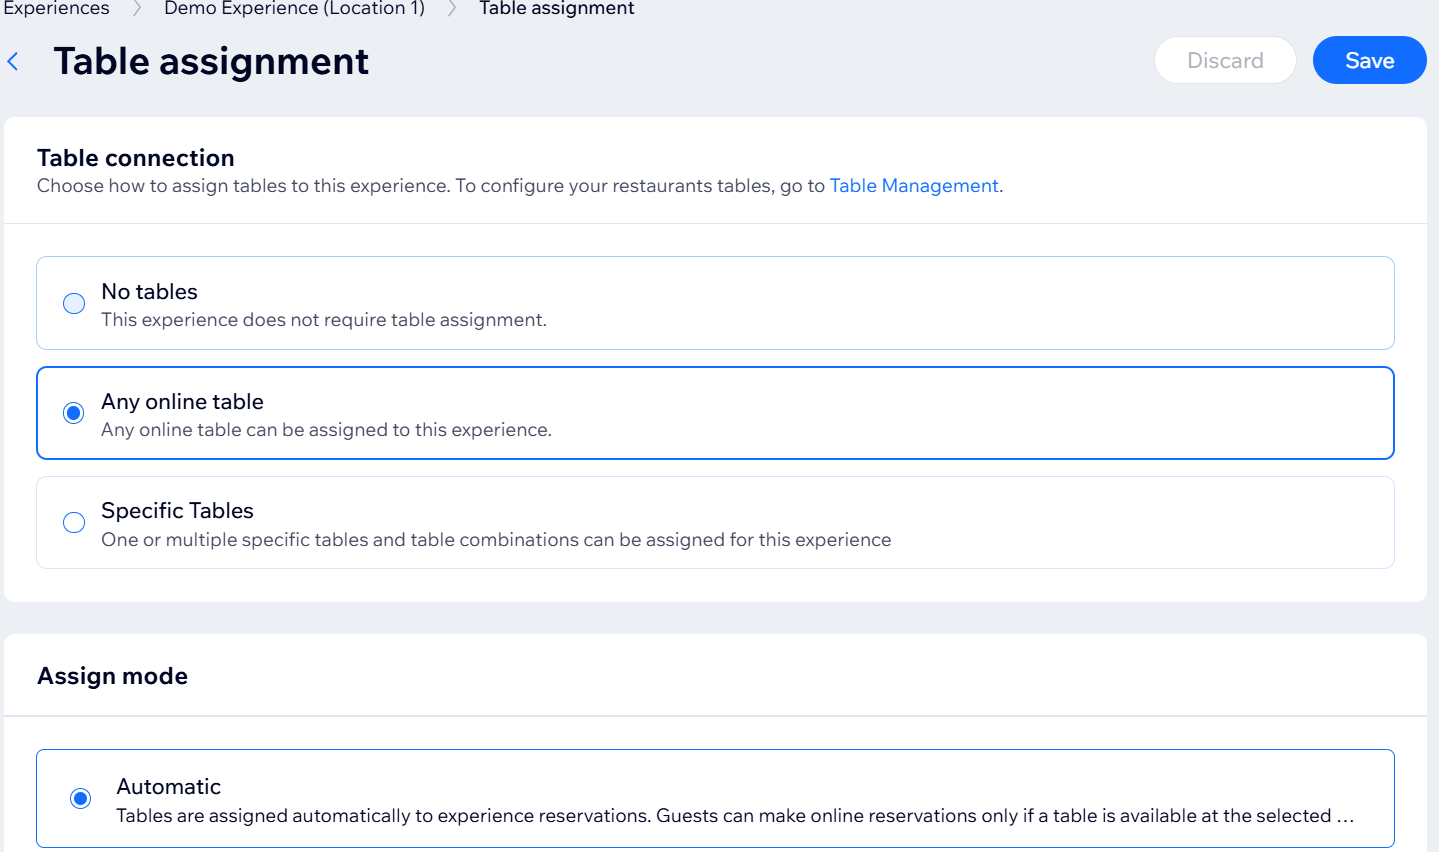
Click Table assignment.
Set up table assignment using the following options:
Table connection: Select how tables are connected to the experience:
No tables: No tables are assigned to the experience.
Any online table: Any table marked as available online can be assigned to experience reservations.
Specific Tables: Select the specific tables and / or table combinations assigned to this experience.
Note: This overrides the individual table's 'available online' setting for the duration of the experience schedule.
Block regular reservations for selected tables: Click the toggle to choose whether standard online reservations are blocked for the selected tables:
Enabled: Standard online reservations are blocked for the selected tables during the experience time and the turn time before it.
Disabled: Standard online reservations remain available for the selected tables.
Assign mode: Select how tables are assigned to experience reservations:
Automatic: Tables are assigned to experience reservations automatically.
Manual: Staff assigns tables to experience reservations manually.
Click Save.
Reservation settings
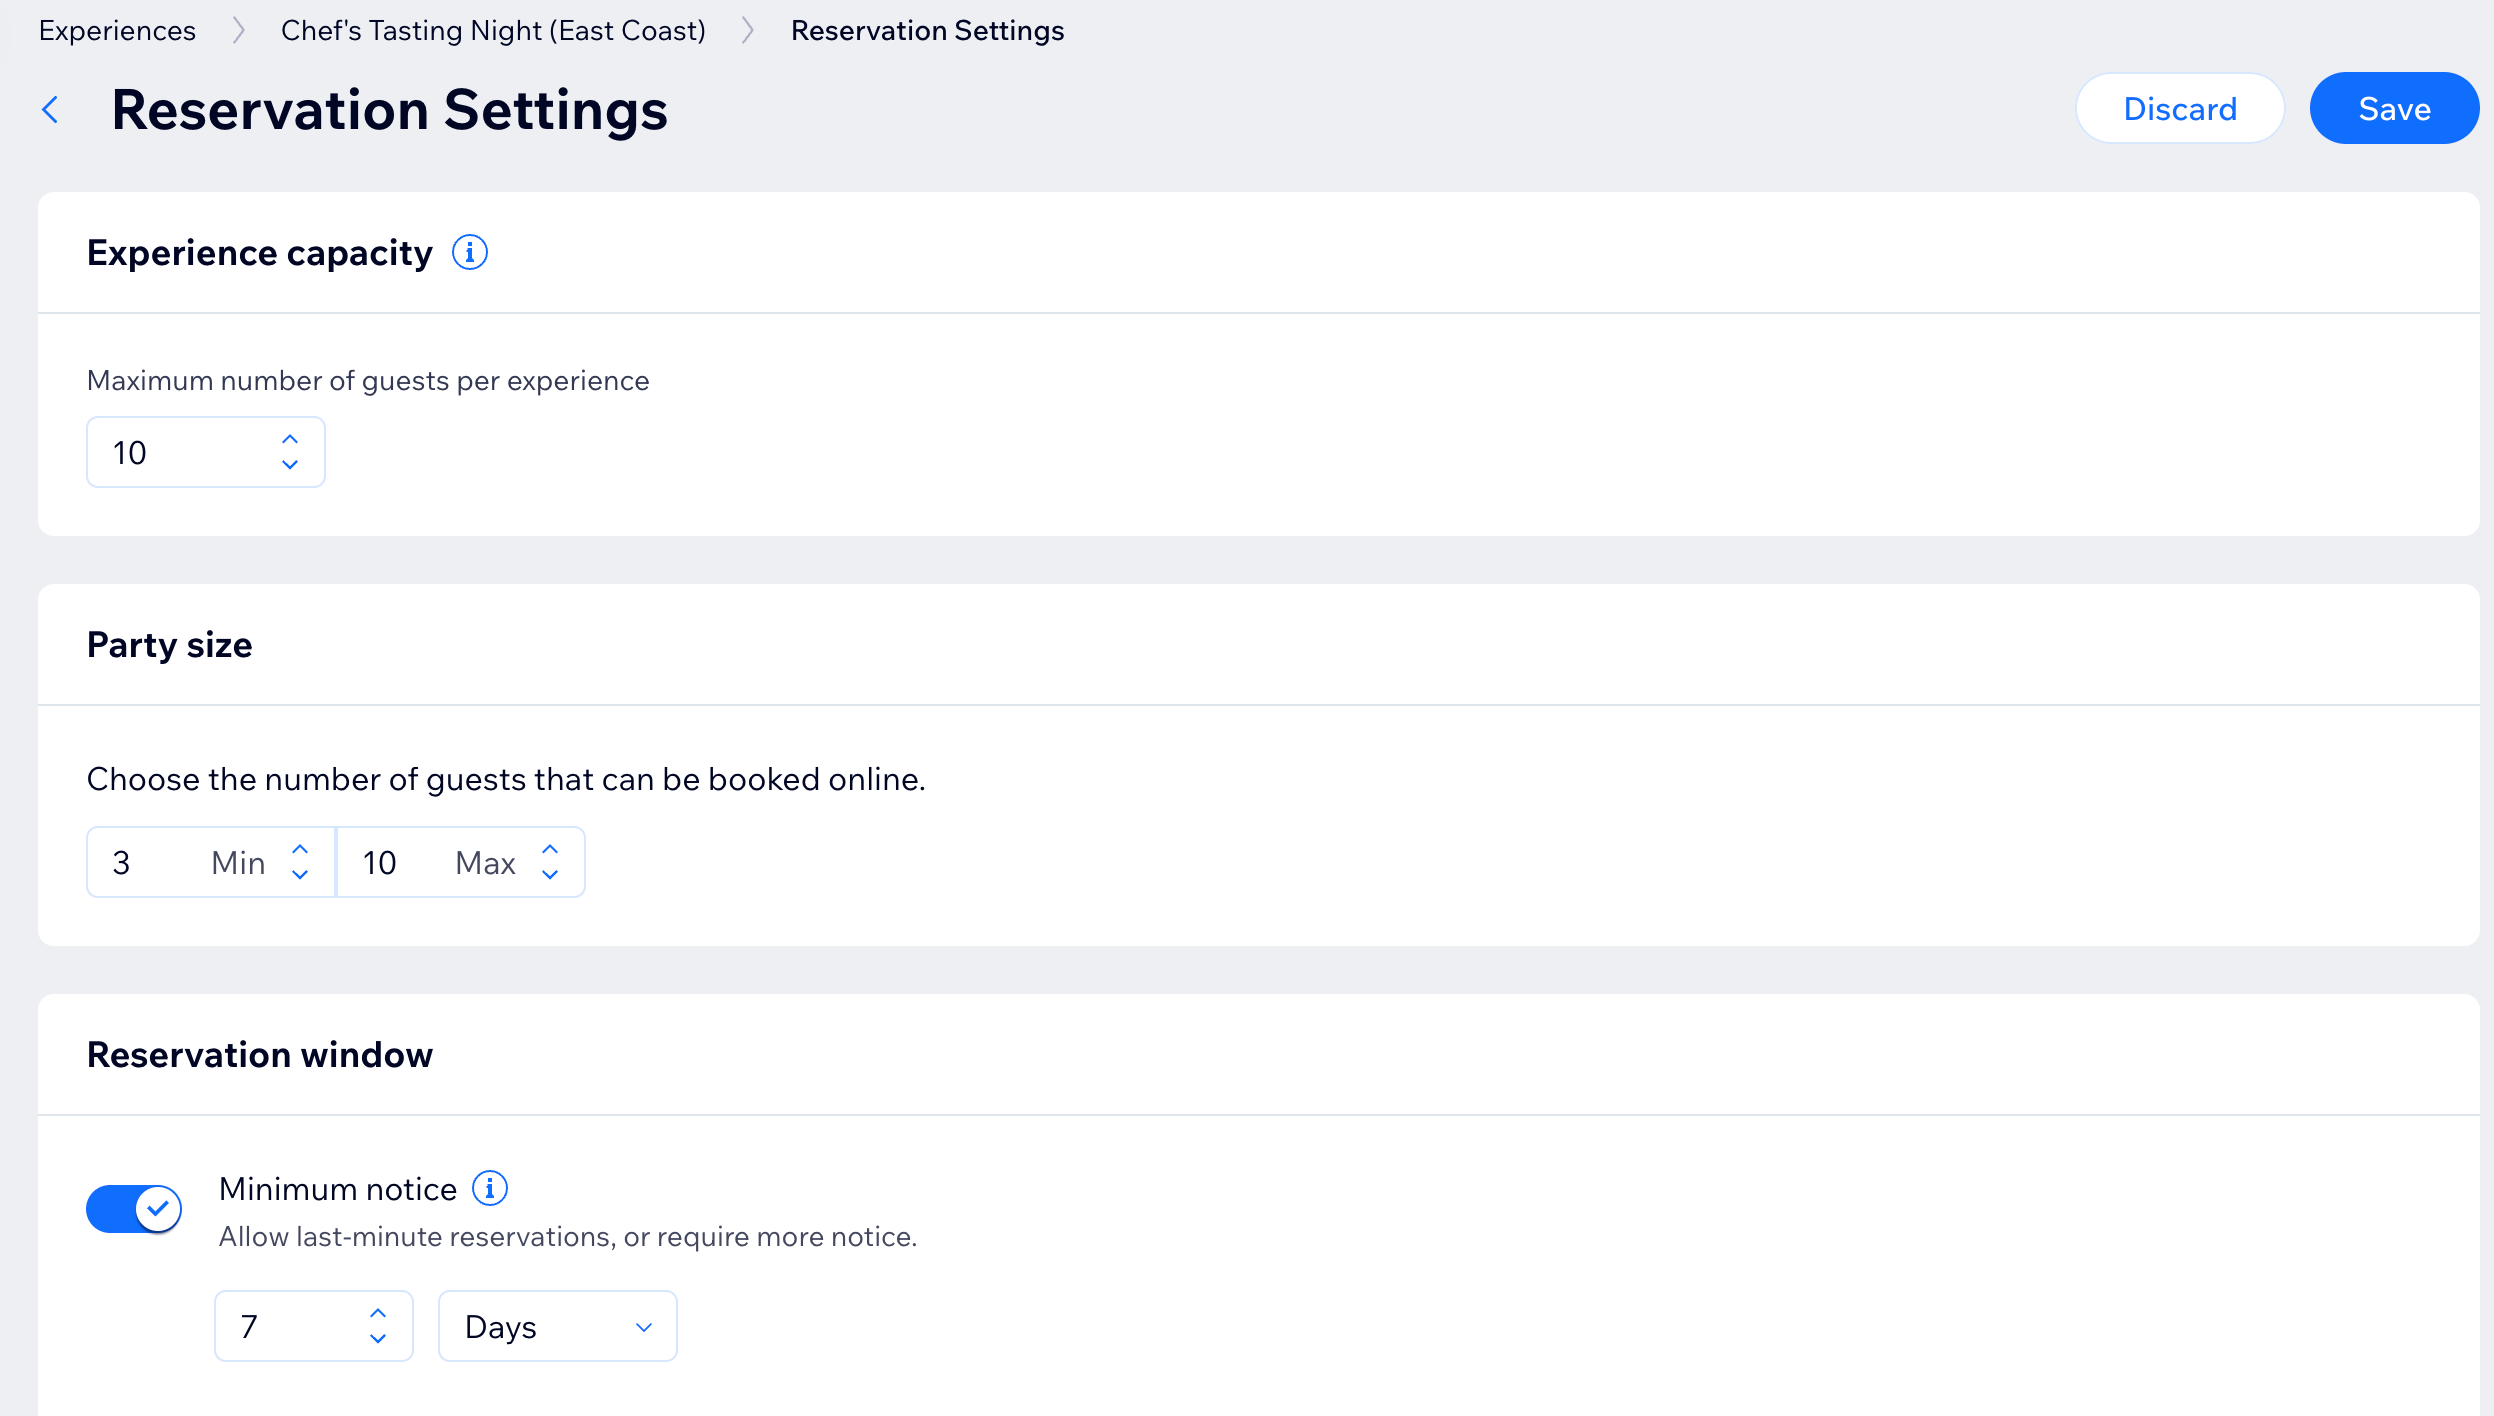
Set details such as the maximum number of guests per time slot, party size limits, and the reservation window.
Click Reservation settings.
Enter the following details:
Experience capacity: The maximum number of guests allowed per time slot.
Party size: The minimum and maximum number of guests per reservation.
Reservation window: The date range when guests can book this experience.
Minimum notice: Choose whether to allow last-minute reservations or require advance notice.
Maximum notice: Set how far in advance guests can make a reservation.
Approval mode: Decide whether reservations are automatically approved or require manual approval.
When finished, click Save.
Reservation form
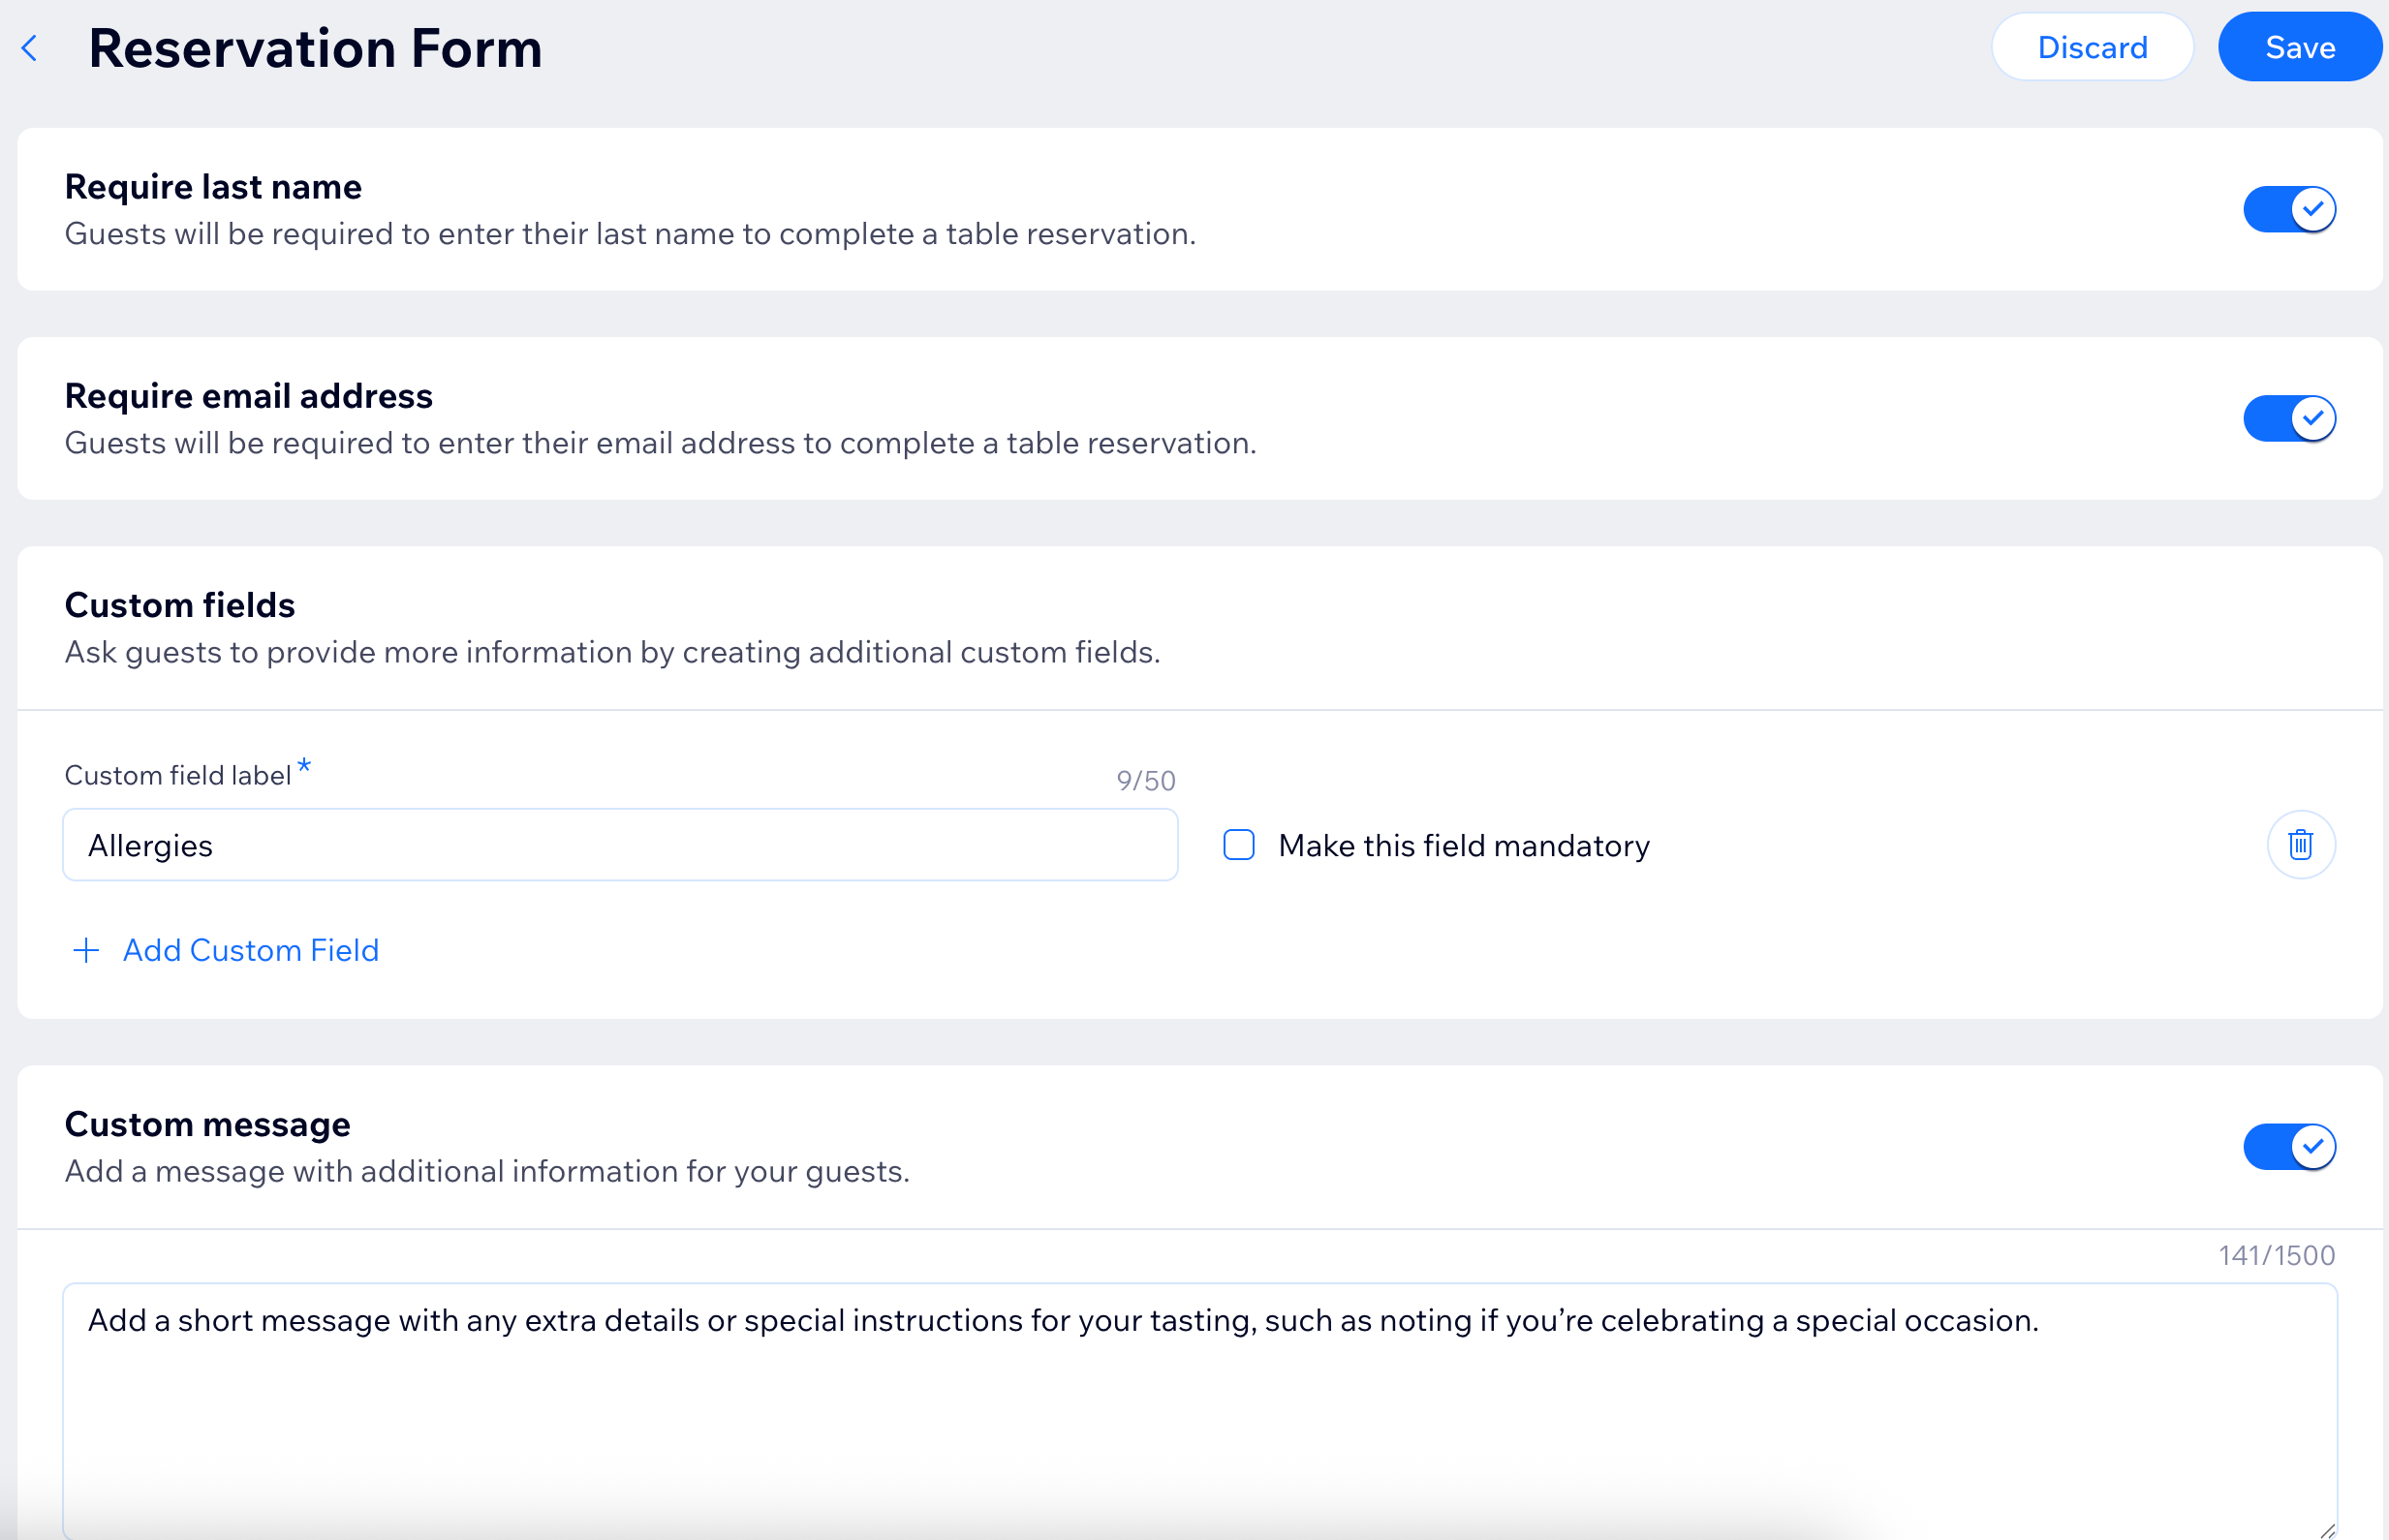
Decide what information guests must provide. You can add custom fields to collect additional details or include a message with extra information for your guests.
Click Reservation form.
Click the Require last name / Require email address toggles to specify which guest details are required:
Click + Add Custom Field and create additional form fields:
Enter the question or prompt under Custom field label you want guests to see (e.g. allergies).
Click the checkbox next to Make this field mandatory if the field must be completed before submitting.
Click + Add Custom Field to create another question or information field.
Click the Custom message toggle to add any additional instructions or context for the guest.
Click the Email marketing checkbox toggle to invite guests to join your mailing list. Then click the checkbox next to Checked by default to choose whether this box is selected automatically for guests.
When you’re finished, click Save
Policies
Add or link your terms and conditions and privacy policy.
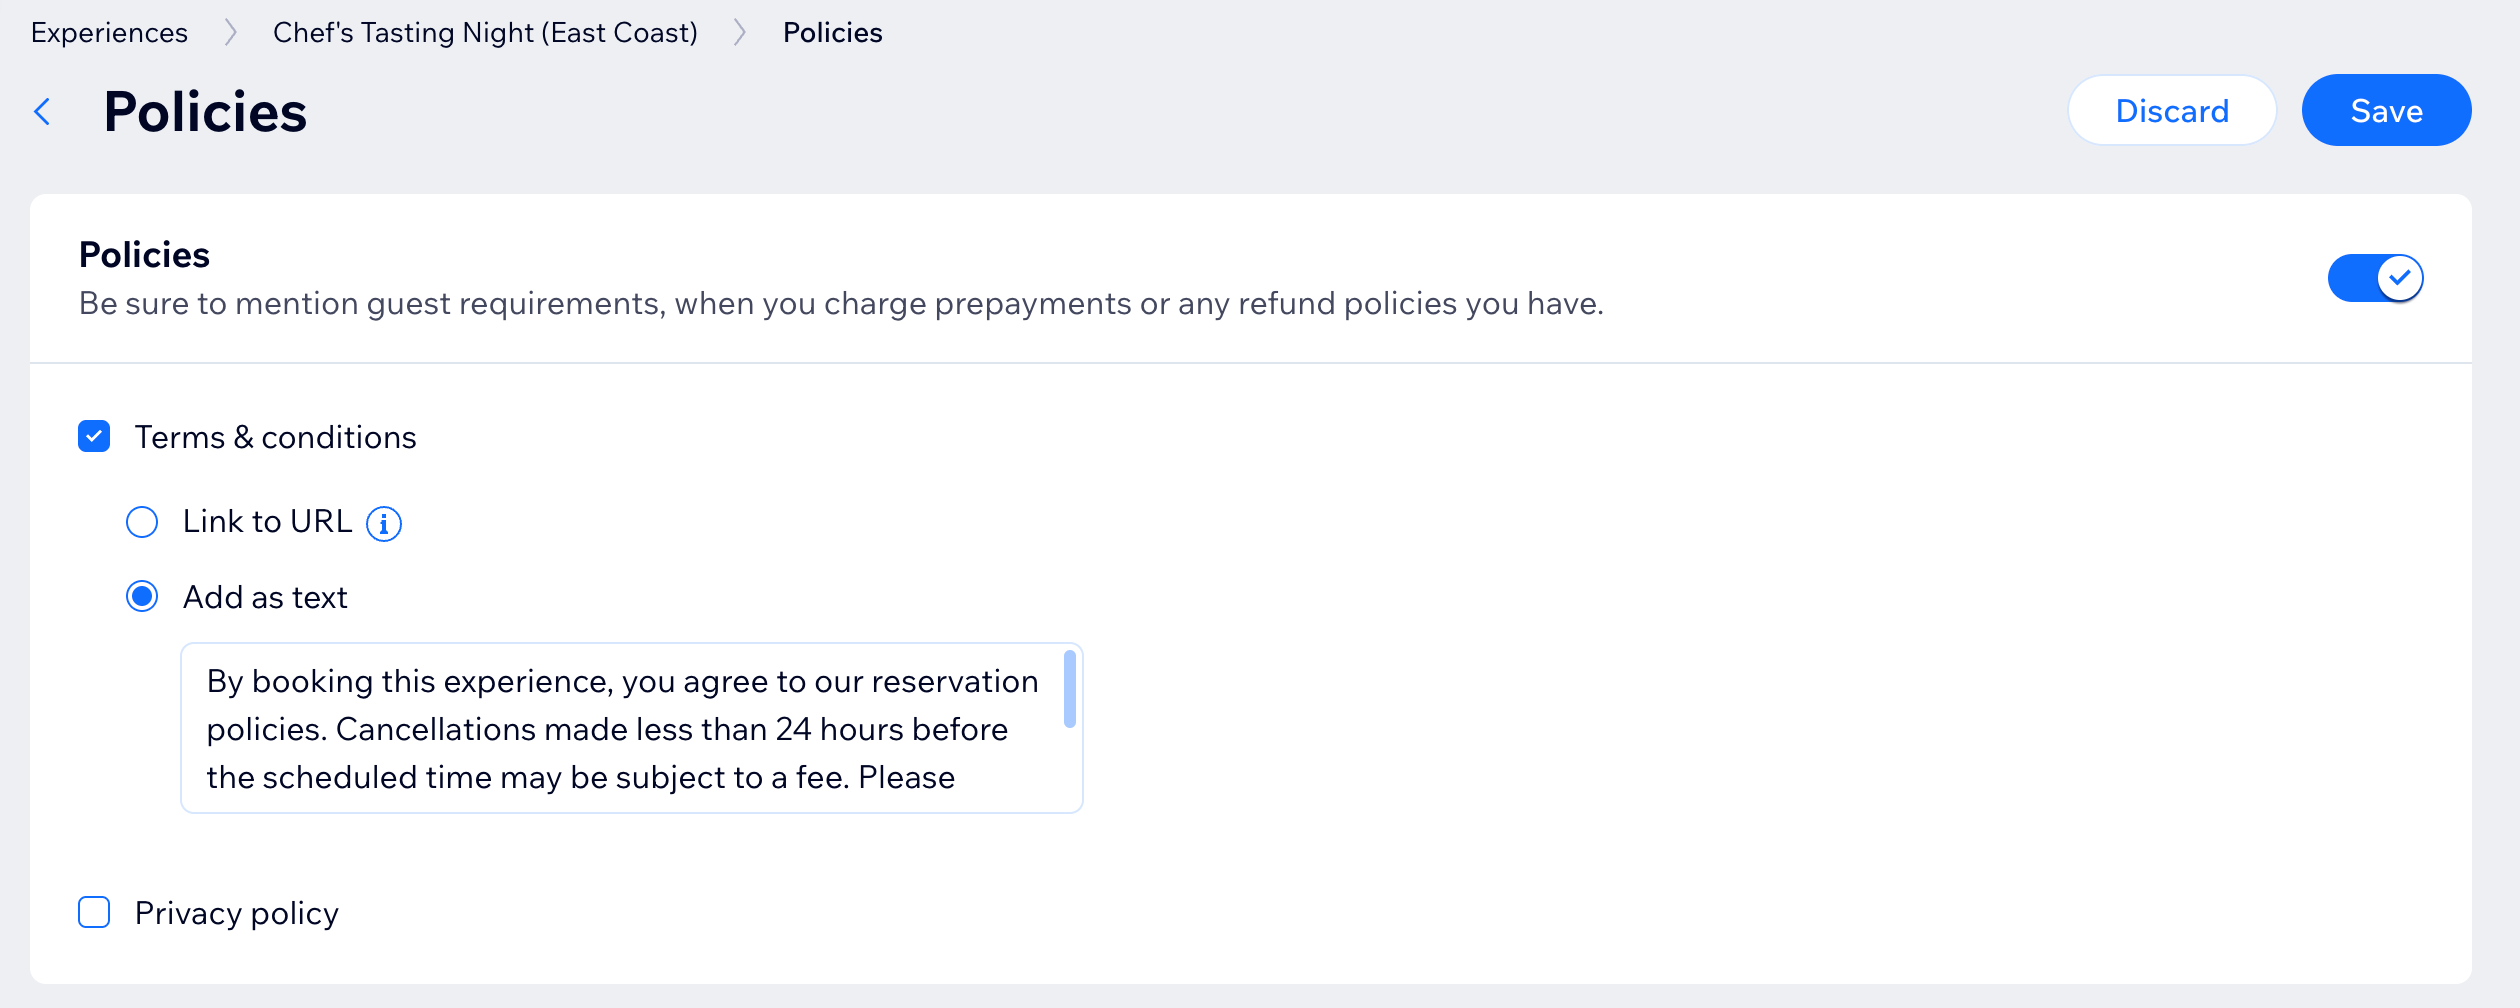
Click Policies.
Click the Policies toggle.
Click the checkbox(s) next to the relevant option(s):
Terms & Conditions / Privacy Policy: Add a link to a dedicated page on your site or add the text directly in the provided field.
Click Save.
Tip:
For full details about choosing table connections, blocking regular reservations for selected tables, and setting assign mode, learn how to set up table assignment for experiences.
What's next?
Turn on online reservations to allow guests to reserve an experience:
Go to Table Reservations in your site's dashboard.
Click Settings at the top right.
Click the Online reservations are toggle to enable or disable online reservations:
Online reservations are on: Customers can book a table on your site.
Online reservations are off: The reservations app appears on your site, but customers won't be able to book a table.
FAQs
Click a question below learn more about creating an experience with table reservations.
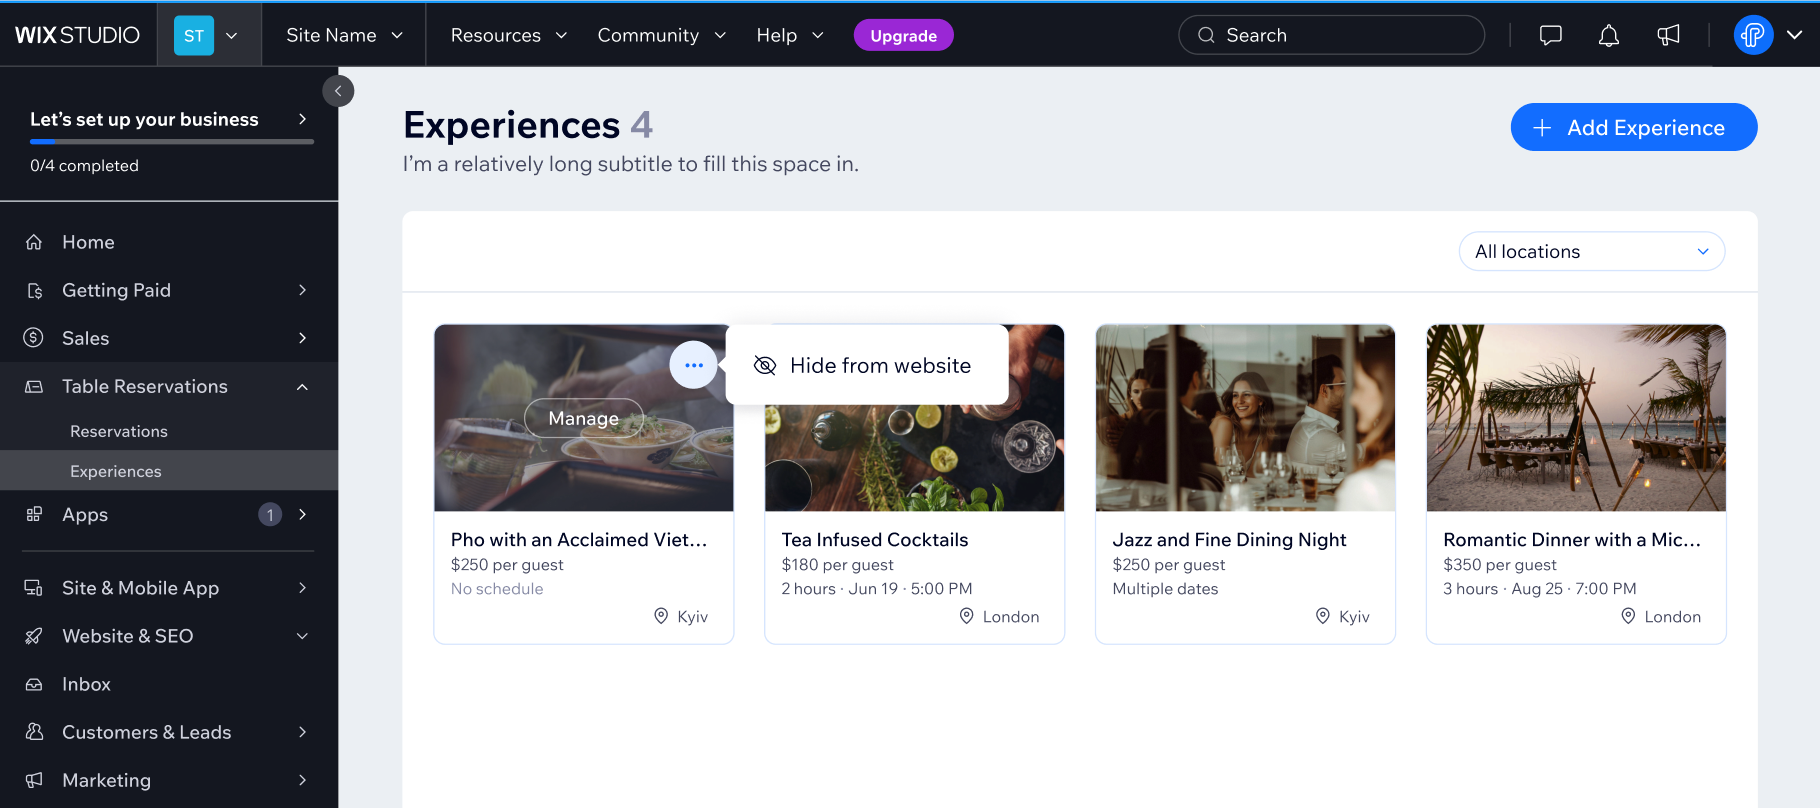
Can I show / hide an experience on my live site?
Yes. You can choose to show or hide an experience on your live site.
Go to Experiences in your site's dashboard.
Hover over the relevant experience and click the More Actions icon

next to relevant experience.
Select Show on site / Hide from site.
Can I change a location after creating an experience?
No. Once you assign and save a location for an experience, it cannot be changed.
Can I assign an experience to more than one location?
No. Currently it is not possible to assign a single experience to multiple locations. However, you can create an experience per location.
Can I delete an experience?
It is not possible to permanently delete an experience. Instead, you can archive it. Archiving an experience hides it from your live site and removes it from your active experiences, so guests can no longer make new reservations for it. Any existing reservations for that experience stay active and you manage them from the Reservations page according to your plans.
Tip: You can still view the experience by filtering the Experiences list by Archived status, but it is read-only until you unarchive it.
How do I archive or unarchive an experience?
To archive an experience:
Go to Experiences in your site's dashboard.
Click the More Actions icon
on the relevant experience.
Click Archive.
Click Archive anyway to confirm.
To unarchive it later, filter the list by archived experiences, click the More Actions icon
again and select Unarchive.
Can I display my experiences on any page?
Yes. You can display your experiences on any static page of your site using the Experience list element in the Wix Editor. Add it from Add Elements, then customize which experiences appear and how the list looks. You can also choose which details to show, such as the image, summary, duration, date, and price.
This article is credited to the Wix team - https://support.wix.com/ and we thank them for that!