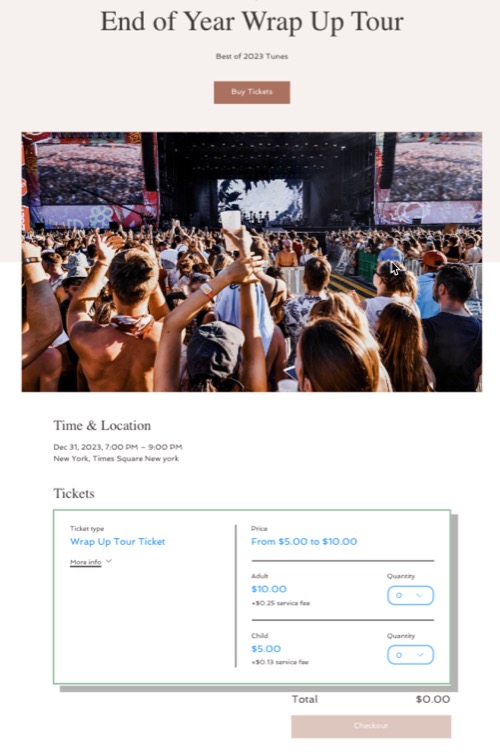
The Event Details page is where you can share all the key information your guests need about your event. This includes an 'About the Event' section, a map of the event location, and the option to display or hide the 'Guests' section.
By showcasing the guest list, you can generate excitement and encourage social interaction by letting attendees see who else will be joining.
Note:
If you have events without tickets (e.g. RSVP events) you have the option of disabling the Event Details Page.
Choosing a layout
Choose how you want to showcase your event details and image. This includes the event header, info and ticket picker where guests select the tickets they want to purchase.
Wix Editor
Go to the Event Details & Registration page:
Click Pages & Menu

on the left side of the editor.
Click Event Pages.
Click Event Details & Registration.
Click the event detailselement on your page.
Click Settings.
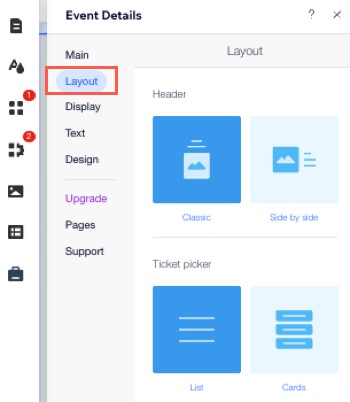
Click the Layout tab.
Customize the layout of your Event Details using the following options:
Layout: Choose a layout for the Header and Ticket picker.
Text: Choose where you want to display the text for your Event Header and Event Info.
Image: Choose how you want to customize the event image by setting the ratio, size, opacity, and background color.
Studio Editor
Go to the Event Details & Registration page:
Click Pages

on the left side of the editor.
Click Event Details & Registration.
Click the event details element on your page.
Click Settings.
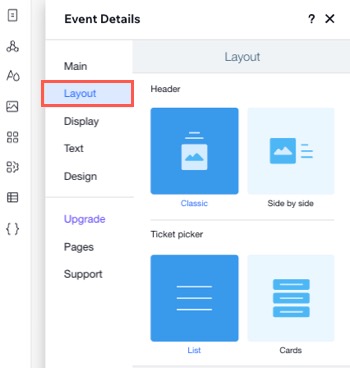
Click the Layout tab.
Customize the layout of your Event Details using the following options:
Layout: Choose a layout for the Header and Ticket picker.
Text: Choose where you want to display the text for your Event Header and Event Info.
Image: Choose how you want to customize the event image by setting the ratio, size, opacity, and background color.
Wix Harmony Editor
Click the Page dropdown at the top left of the page.
(In the Site Pages panel) Select the Event Details & Registration page under Event Pages.
Tip: Jump to the page you need by clicking the dropdown next to Site Pages and selecting Event Pages.
Click the events element on your page.
Click the Settings icon

on the action bar.
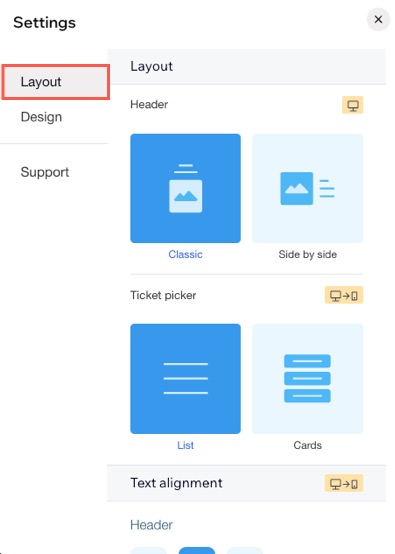
Click the Layout tab.
Customize the layout using the following options:
Layout: Choose a layout for the Header and Ticket picker.
Text alignment: Choose where you want to display the text for your Header and Event info.
Image: Choose how you want to customize the event image by setting the ratio, size, opacity, and background color.
Selecting which elements to display
Customize your event details page by selecting which elements to display. For example, you can show or hide the 'Guests' section to manage attendee visibility.
Wix Editor
Go to the Event Details & Registration page:
Click Pages & Menu
on the left side of the editor.
Click Event Pages.
Click Event Details & Registration.
Click the event detailselement on your page.
Click Settings.
Click the Display tab.
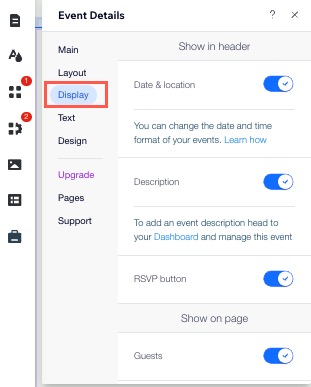
Enable the toggles to display the relevant information:
Show in header
These appear on the header of your Event Page.
Date & Location: The date and location appear above the event title.
Description: The "short teaser" text appears under the event title.
RSVP Button: Show or hide the RSVP button in the page header.
Important: There are 2 RSVP buttons, one in the header and one on the page. If you disable both, guest won't be able to register for RSPV events. They can, however, still purchase tickets for ticketed events.
Show on page
These appear on your Event Details page.
Guests: The number of guests attending an event.
About section: Displays the "About the event".
Show More link: If your "About the Event" text is long, you can show a limited amount of text with a "Show More" link.
Connected group: Shows any groups you connected.
Membership: Displays your membership offers.
Schedule: Displays the event's schedule.
More Info ticket link: Provides additional details or information about the event or ticket purchase.
Map: A map with the event location appears under the About The Event section.
Note: You can set the location of the event in the Event Details section.
Share on social: Social share buttons appear at the bottom of the page.
RSVP Button: Show or hide the RSVP button in the body of the page.
Studio Editor
Go to the Event Details & Registration page:
Click Pages
on the left side of the editor.
Click Event Details & Registration.
Click the event details element on your page.
Click Settings.
Click the Display tab.
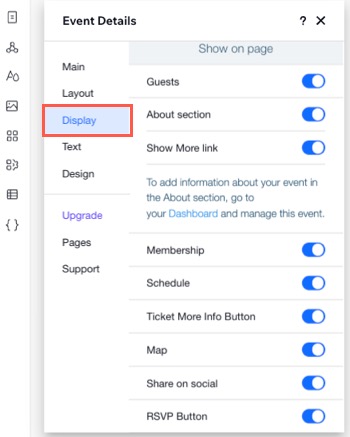
Enable the toggles to display the relevant information:
Show in header
These appear on the header of your Event Page.
Date & Location: The date and location appear above the event title.
Description: The "short teaser" text appears under the event title.
RSVP Button: Show or hide the RSVP button in the page header. Important: There are 2 RSVP buttons, one in the header and one on the page. If you disable both, guest won't be able to register for RSPV events. They can, however, still purchase tickets for ticketed events.
Show on page
These appear on your Event Details page.
Guests: The number of guests attending an event.
About section: Displays the "About the event".
Show More link: If your "About the Event" text is long, you can show a limited amount of text with a "Show More" link.
Connected group: Shows any groups you connected.
Membership: Displays your membership offers.
Schedule: Displays the event's schedule.
Ticket More Info Button: Provides additional details or information about the event or ticket purchase.
Map: A map with the event location appears under the About The Event section. Note: You can set the location of the event in the Event Details section.
Share on social: Social share buttons appear at the bottom of the page.
RSVP Button: Show or hide the RSVP button in the body of the page.
Wix Harmony Editor
Click the Page dropdown at the top left of the page.
(In the Site Pages panel) Select the Event Details & Registration page under Event Pages. Tip: Jump to the page you need by clicking the dropdown next to Site Pages and selecting Event Pages.
Click the event details element on your page.
Click the Display Elements icon

on the action bar.
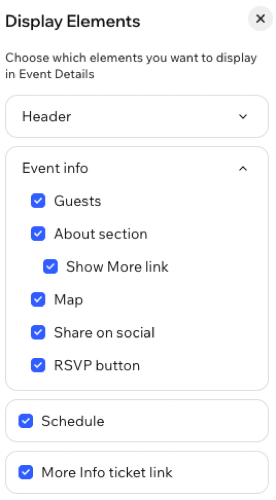
Select the checkboxes to display the relevant information:
Header
These appear on the header of your Event Details page.
Date and location: The date and location appear under the event title.
Description: The "short teaser" text appears under the event title.
RSVP Button: Show or hide the RSVP button in the page header.
Important: There are 2 RSVP buttons, one in the header and one on the page. If you disable both, guests won't be able to register for RSVP events. They can, however, still purchase tickets for ticketed events.
Event image: The image you added while creating the event.
Event info
These appear on your Event Details page, below the header.
Guests: The number of guests attending your event.
About section: Displays the 'About the event' section. If the text in this section is long, you can select the checkbox next to Show More link. This displays a limited amount of text and a 'Show More' link that leads guests to the full description.
Map: A map with the event location appears under the 'About the event' section.
Note: You can set the location of the event in the Event Details section.
Share on social: Social share buttons appear at the bottom of the page.
RSVP button: Show or hide the RSVP button in the body of the page.
Schedule and More Info
Schedule: Displays the event's schedule.
More Info ticket link: Provides additional details or information about the event or ticket purchase.
Editing text
Your page comes with certain default text that you can edit to match your voice and tone. Change the titles, links and buttons across the page so they suit your events.
Wix Editor
Go to the Event Details & Registration page:
Click Pages & Menu
on the left side of the editor.
Click Event Pages.
Click Event Details & Registration.
Click the event details element on your page.
Click Settings.
Click the Text tab.
Choose what you want to edit:
Tip: You may not see options you have not set up or have hidden.
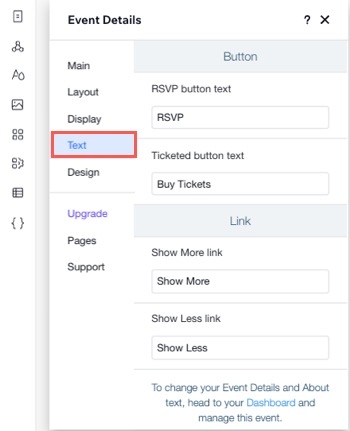
Button
This is the text that appears on the buttons.
RSVP event button text: Visitors at an event without tickets click this button to register.
Ticketed event button text: Visitors at a ticketed event click this button to register.
Link
This is the text that appears on the links.
Read More Link: Visitors click this link to expand the "About The Event" section.
Read Less Link: Visitors click this link to collapse the "About The Event" section.
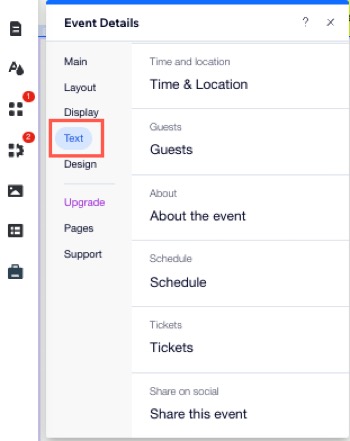
Event titles
This is the text displayed within the event titles.
Time & Location: This title appears above the time and location details.
Guests Title: Title above display of members that are attending.
About: This title appears above the "About The Event" section.
Schedule Title Text: Appears above your event schedule.
Tickets: Ticket section title.
Social Share: This title appears above the social share icons
Studio Editor
Go to the Event Details & Registration page:
Click Pages
on the left side of the editor.
Click Event Details & Registration.
Click the event details element on your page.
Click Settings.
Click the Text tab.
Choose you want to edit:
Tip: You may not see options you have not set up or have hidden.
Button
This is the text that appears on the buttons.
RSVP event button text: Visitors at an event without tickets click this button to register.
Ticketed event button text: Visitors at a ticketed event click this button to register.
Link
This is the text that appears on the links.
Read More Link: Visitors click this link to expand the "About The Event" section.
Read Less Link: Visitors click this link to collapse the "About The Event" section.
Event titles
This is the text displayed within the event titles.
Time & Location: This title appears above the time and location details.
Guests Title: Title above display of members that are attending.
About: This title appears above the "About The Event" section.
Schedule Title Text: Appears above your event schedule.
Tickets: Ticket section title.
Social Share: This title appears above the social share icons
Wix Harmony Editor
Click the Page dropdown at the top left of the page.
(In the Site Pages panel) Select the Event Details & Registration page under Event Pages. Tip: Jump to the page you need by clicking the dropdown next to Site Pages and selecting Event Pages.
Click the event details element on your page.
Click Edit Text on the action bar.
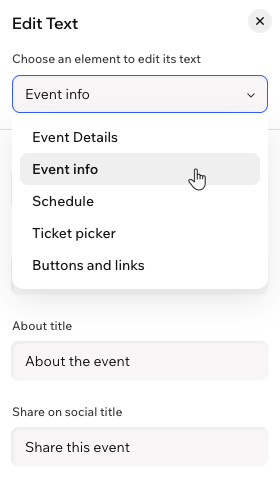
Choose which element to edit from the Choose an element to edit its text dropdown.
Event info
This is the text that appears below the header on your event page. You can edit these section titles to match your event’s tone and make the information clearer for guests.
Time and location title: Edit the title above your event’s date, time, and location details.
Guests title: Edit the title above the guest list.
About title: Edit the title above the event description.
Share on social title: Edit the title above the social share icons.
Schedule and Ticket picker
This is the text that appears in the 'Schedule' and 'Tickets' sections on your event page. You can update these titles to better match your event’s style and help guests quickly understand what each section shows.
Schedule title: Edit the title above your event schedule.
Ticket picker title: Edit the title above the ticket selection section.
Buttons and links
This is the text that appears on buttons and links across your event page:
RSVP event button: Edit the text on the button guests click to RSVP to an event without tickets.
Ticketed event button: Edit the text on the button guests click to buy tickets for a ticketed event.
Show More link: Edit the link text that expands the 'About the event' section.
Show Less link: Edit the link text that collapses the 'About the event' section.
Customizing the design
Select the colors, fonts, button shapes, and more to create an event page that guests find inviting.
Tip:
The available design options may vary depending on your layout and display selections.
Wix Editor
Go to the Event Details & Registration page:
Click Pages & Menu
on the left side of the editor.
Click Event Pages.
Click Event Details & Registration.
Click the Event Detailselement on your page.
Click Settings.
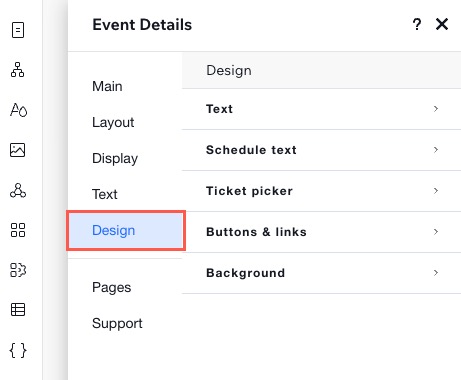
Click the Design tab.
Choose what you want to design:
Text
Click Text to customize the fonts and colors of any of these options:
Header Date & Location: Customize the date and location text that appears above the event name.
Event Name: Customize the event name.
Description: Customize the description text (short teaser).
Title: Customize the titles in the body of the page.
Text: Customize the general text in the body of the page.
Ticket Name: Customize the ticket text (if you're selling tickets).
Additional Info: Customize additional text, such as additional ticket info, fees, or ticket sales period dates.
Schedule text
If you added an event schedule, click Schedule text to customize the fonts and colors of any of the options.
Ticket picker
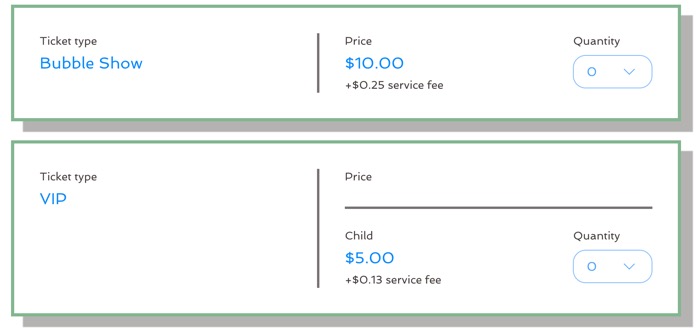
Click Ticket picker to customize the place where guests view and select their desired tickets.
Text: Set the font and color of your ticket info (e.g. ticket name and price).
Card: Set the background, border and opacity that surrounds the ticket information (e.g name, price).
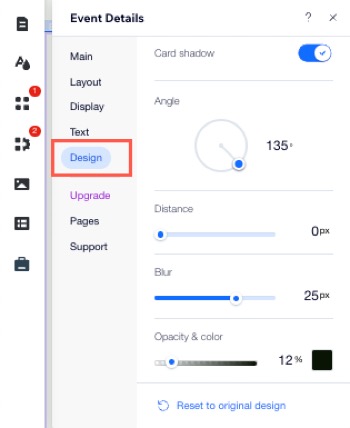
Shadow: Customize the shadow design settings for your ticket picker.
Card shadow: Enable the toggle to display a shadow behind the ticket picker.
Angle: Set the angle for the shadow to be displayed.
Distance: Set the distance for your shadow.
Blur: Set the blur of your shadow displayed behind the ticket picker.
Opacity & Color: Choose a color and set the opacity for the shadow of your ticket picker.
Button & links
Click Button & links to customize the fonts and colors of any of these options:
Choose a Style: Select a preset style for the button.
Font Style: Click the drop-down menu to select the font style.
Corner Radius: Choose a corner radius (the higher the radius, the rounder the corners).
First Button: Customize the RSVP button which appears in the header:
Text Color: Select the color of the button text.
Background/Border Opacity & Color: Choose a color and set the opacity for the button background.
Second Button: Customize the second RSVP button (if enabled on the Display tab) which appears under the About The Event section.
Text Color: Select the color of the button text.
Background/Border Opacity & Color: Choose a color and set the opacity for the button background.
Links: Select a color for the available links displayed on your event (e.g. "See all" under Guests).
Background
Click Background to customize the header and page background colors:
Header Background: Choose a color and set the opacity.
Page Background: Choose a color and set the opacity.
Ticket Divider: Drag the slider to change the divider line thickness.
Studio Editor
Go to the Event Details & Registration page:
Click Pages
on the left side of the editor.
Click Event Details & Registration.
Click the Event Details element on your page.
Click Settings.
Click the Design tab.
Choose what you want to design:
Text
Click Text Design to customize the fonts and colors of any of these options:
Header Date & Location: Customize the date and location text that appears above the event name.
Event Name: Customize the event name.
Description: Customize the description text (short teaser).
Title: Customize the titles in the body of the page.
Text: Customize the general text in the body of the page.
Ticket Name: Customize the ticket text (if you're selling tickets).
Additional Info: Customize additional text, such as additional ticket info, fees, or ticket sales period dates.
Schedule text
If you added an event schedule, click Schedule text to customize the fonts and colors of any of the options.
Ticket picker
Click Ticket picker to customize the place where guests view and select their desired tickets.
Text: Set the font and color of your ticket info (e.g. ticket name and price).
Card: Set the background, border and opacity that surrounds the ticket information (e.g name, price).
Shadow: Customize the shadow design settings for your ticket picker.
Card shadow: Enable the toggle to display a shadow behind the ticket picker.
Angle: Set the angle for the shadow to be displayed.
Distance: Set the distance for your shadow.
Blur: Set the blur of your shadow displayed behind the ticket picker.
Opacity & Color: Choose a color and set the opacity for the shadow of your Ticket Picker.
Buttons & links
Click Buttons & links to customize the fonts and colors of any of these options:
Choose a Style: Select a preset style for the button.
Font Style: Click the drop-down menu to select the font style.
Corner Radius: Choose a corner radius (the higher the radius, the rounder the corners).
First Button: Customize the RSVP button which appears in the header:
Text Color: Select the color of the button text.
Background/Border Opacity & Color: Choose a color and set the opacity for the button background.
Second Button: Customize the second RSVP button (if enabled on the Display tab) which appears under the About The Event section.
Text Color: Select the color of the button text.
Background/Border Opacity & Color: Choose a color and set the opacity for the button background.
Links: Select a color for the available links displayed on your event (e.g. "See all" under Guests).
Background
Click Background to customize the header and page background colors:
Header Background: Choose a color and set the opacity.
Page Background: Choose a color and set the opacity.
Ticket Divider: Drag the slider to change the divider line thickness.
Wix Harmony Editor
Click the Page dropdown at the top left of the page.
(In the Site Pages panel) Select the Event Details & Registration page under Event Pages. Tip: Jump to the page you need by clicking the dropdown next to Site Pages and selecting Event Pages.
Click the Events element on your page.
Click the Settings icon
on the action bar.
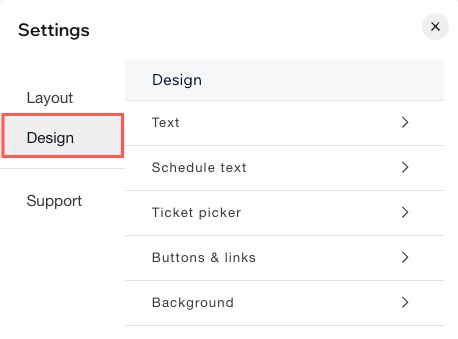
Click the Design tab.
Choose what you want to design:
Text
Click Text to customize the fonts and colors of any of these options:
Header: Customize the Event date, Event location, Event name and Description text that appears below the event name.
Event info: Customize the Titles, Event date, Event location, Text and About section.
You can customize each text element individually. Click the Text icon

to change the style, font, font weight, font size, and text formatting. Click the color circle to open the color picker and select a different text color. You can select a color from your Brand palette or a Custom color.
Tip: Click Back at the top of the panel to return to the main Design menu.
Schedule text
If you added an event schedule, click Schedule text to customize the fonts and colors of the schedule text: Time, Duration, Title, and Place.
Tip: Click Back at the top of the panel to return to the main Design menu.
Ticket picker
Click Ticket picker to customize the place where guests view and select their desired tickets.
Text: Set the font and color of your ticket info (e.g., ticket name and price).
List: Customize the look of the ticket list, including the divider lines and the quantity selector box where guests choose how many tickets to buy. You can adjust details such as the color, opacity, width, and corner style by dragging the sliders or entering a value.
Changed your mind? Click Reset to original design at the bottom of the panel to restore the original look.
Tip: Click Back at the top of the panel to return to the main Design menu.
Buttons & links
Click Buttons & links to customize the fonts and colors of any of these options:
Button design: Choose the shape of your buttons and adjust the corner radius to make them more rounded or more square. Drag the slider or enter a value to set the corner radius.
First Button: Customize the RSVP button (if enabled on the Display elements panel) which appears in the header:
Font style & color: Choose the font and text color for the button.
Background opacity & color: Choose the background color and set its opacity.
Second Button: Customize the 'Checkout' button which appears under the Tickets section.
Font style & color: Choose the font and text color for the button.
Background opacity & color: Choose the background color and set its opacity.
Links and active elements: Select a color for the available links displayed on your event (e.g., "See all" under Guests) and the Social sharing icons.
Tip: Click Back at the top of the panel to return to the main Design menu.
Background
Click Background to customize the header and page background colors:
Header: Choose a color and set the opacity for the header background and set the opacity.
Page: Choose a color and set the opacity for the page background and the ticket dividers.
Tip: Click Back at the top of the panel to return to the main Design menu.
Note:
Changes will affect smaller screen sizes.
This article is credited to the Wix team - https://support.wix.com/ and we thank them for that!